Backyard flooding is not solved by adding a drain, but by calculating water volume and engineering your landscape to absorb or divert it as a system.
- Diagnose the source—high water tables require elevation, while surface runoff requires absorption capacity calculated to your roof square footage.
- Hardscapes must be breathable; gravel and permeable pavers outperform solid surfaces that generate destructive sheet flow.
- Foundation protection demands negative grading and capillary breaks, not decorative mulch beds that wick moisture into walls.
Recommendation: Treat your property as a watershed engineering project, sizing each element to specific hydrological loads rather than aesthetic preferences.
Every heavy rain reveals the same hydraulic failure: water pooling against foundations, basement seepage through mortar joints, and soggy lawns that remain marsh-like for days, rendering outdoor space unusable. Homeowners typically respond with reactive mechanical measures—sump pumps cycling continuously, French drains installed as afterthoughts, or aggressive regrading with rented equipment—treating water as an invader to be expelled rather than a calculable volume to be managed. These platitudes address acute symptoms while ignoring the site’s fundamental hydrology, often exacerbating downstream flooding or merely relocating the problem to adjacent properties.
But what if the solution requires treating your residential landscape as green infrastructure? The most effective drainage designs engineer the property as an integrated watershed, calculating runoff coefficients, absorption rates, and hydraulic retention volumes rather than relying on cosmetic fixes. By understanding whether you face a high water table requiring elevation or surface runoff demanding infiltration, sizing rain gardens to precise roof measurements rather than guesswork, and selecting materials that maintain soil breathability, you transform your yard from a flood liability into a managed hydrological system. This guide approaches residential drainage through the quantitative lens of landscape architecture, providing calculated, verifiable solutions for diagnosis, absorption, and long-term resilience.
To engineer an effective drainage solution, you must first analyze your specific water dynamics, then size interventions to match calculated loads. The following sections provide a systematic approach to diagnosing problems, designing absorption systems, and protecting your property’s most vulnerable points.
Table of Contents: Engineering Your Landscape Drainage System
- Is it a high water table or just surface runoff (and why it matters)?
- How to size a rain garden to absorb the runoff from your roof gutter?
- Gravel vs. Permeable Pavers: Which driveway option handles heavy rain best?
- The landscaping mistake of building flower beds that trap water against the house walls
- How to document your drainage improvements to potentially lower your insurance premium?
- Demountable barriers or Landscape grading: Which flood protection alters the site aesthetics less?
- Why do natural fibers prevent mold better than synthetic foam in old stone walls?
- How to Retrofit Historic Monuments to Withstand Increasing Flood Risks?
Is it a high water table or just surface runoff (and why it matters)?
Before installing any drainage infrastructure, you must distinguish between groundwater intrusion and surface hydrology. These two failure modes require opposing solutions: high water tables demand elevation and capillary breaks, while surface runoff requires infiltration capacity and flow redirection.
Execute a three-step diagnostic test. First, excavate a test pit three feet deep in the problem area and saturate the soil with water. If water persists after twenty-four hours, your soil exhibits poor percolation, limiting absorption-based solutions. Second, if you encounter standing water before reaching three feet, you are dealing with a high water table, necessitating raised beds or subsurface drainage mats rather than rain gardens. Third, observe water behavior during precipitation events: sheet flow across the surface indicates runoff management needs, while bubbling from below signals groundwater pressure.
This distinction matters because misdiagnosis leads to system failure. Installing infiltration basins in high water table zones creates permanent ponds, while elevating structures unnecessarily in runoff-only areas wastes resources. The Bishan Park project in Singapore demonstrates effective dual management, where landscape architects integrated multi-use public spaces with engineered topography to divert, absorb, and capture water simultaneously.
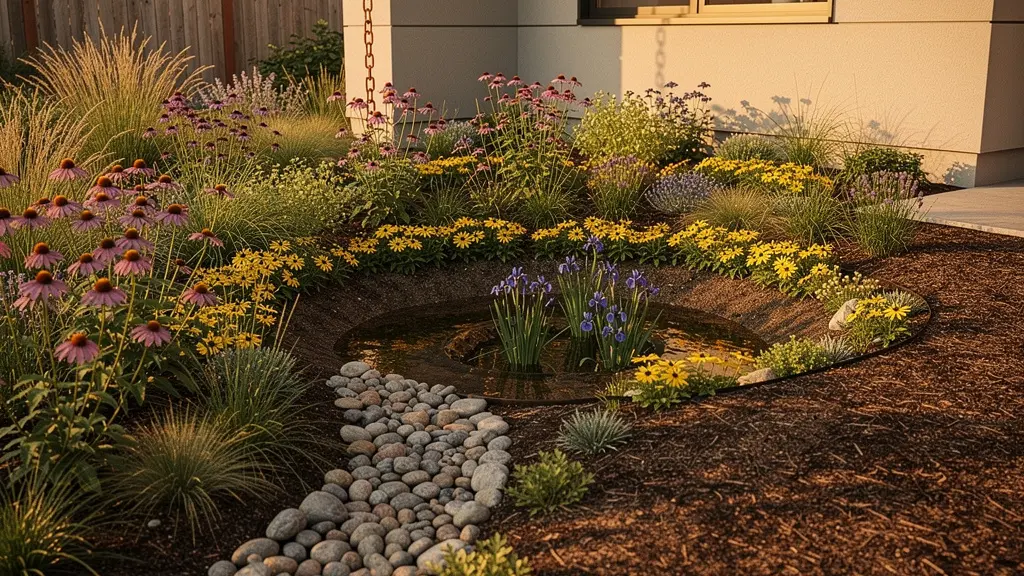
How to size a rain garden to absorb the runoff from your roof gutter?
Once you have confirmed surface runoff as your primary challenge, calculating absorption volume becomes a mathematical necessity rather than a gardening preference. Rain gardens fail when undersized, creating overflow during peak events, or when over-engineered, wasting valuable landscape area.
The sizing formula depends on your roof’s footprint and local soil percolation rates. TreePeople’s calculation guide shows that a 400 square foot roof area requires only a 50 square foot rain garden (5′ x 10′) to capture three-quarters of an inch of rainfall, managing approximately 187.5 gallons of water. This represents roughly 26% of the roof area—a baseline ratio for residential applications.
Soil texture modifies these dimensions significantly. Clay soils necessitate gardens twice as large as sandy substrates due to slower percolation. The engineering specifications vary by substrate type as follows:
| Soil Type | Recommended Depth | Size Factor | Drainage Time |
|---|---|---|---|
| Clay | 3-4 inches | Divide by 2 | 24-48 hours |
| Loam | 5-6 inches | Divide by 3 | 12-24 hours |
| Sandy | 6-8 inches | Divide by 5 | Less than 12 hours |

Proper planting follows a three-zone hydrozoning strategy. The central wet zone hosts species tolerant of standing water, the slope zone transitions to mesic plants, and the outer dry edge accommodates xerophytic vegetation. This botanical engineering maximizes infiltration while maintaining aesthetic function.
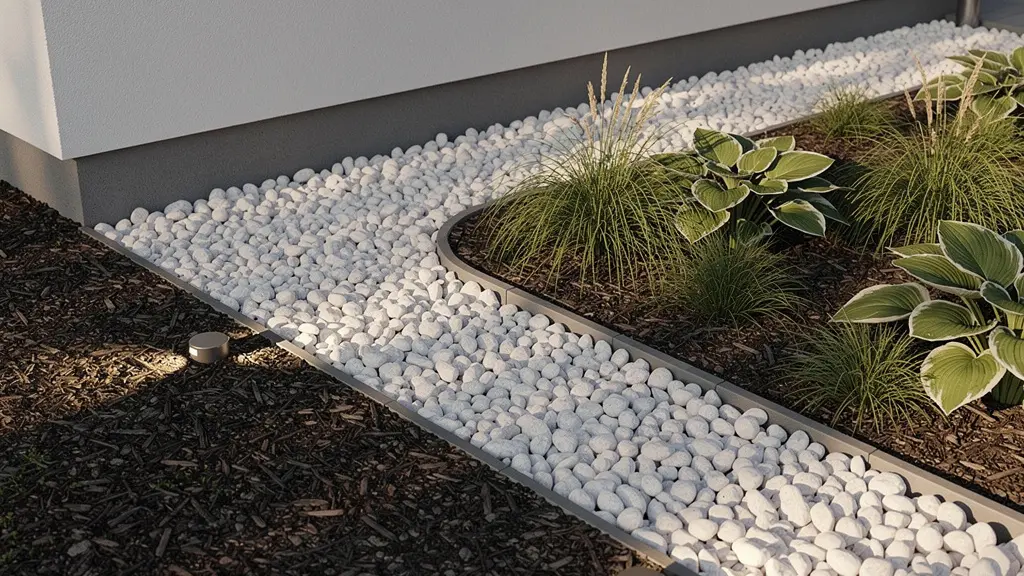
Gravel vs. Permeable Pavers: Which driveway option handles heavy rain best?
Driveways constitute the largest impervious surface on most residential properties, generating significant hydraulic load during precipitation events. According to the American Institute of Building Design, urban stormwater runoff stands as the leading contributor of water resource pollution, making driveway permeability an environmental imperative beyond mere flood prevention.
Traditional solid paving creates sheet flow that overwhelms municipal storm systems and erodes receiving landscapes. The choice between gravel and permeable pavers involves trade-offs between infiltration rate, maintenance requirements, and load-bearing capacity. Gravel driveways offer superior permeability—nearly 100% surface infiltration—with immediate saturation of underlying soils. However, they require periodic replenishment and perform poorly under heavy snow removal equipment.
Permeable pavers provide structural integrity for vehicle traffic while allowing vertical infiltration through joints filled with open-graded aggregate. Unlike solid surfaces, these systems reduce runoff velocity and filter particulates before water reaches subsoils. Living driveway hybrid solutions combine both approaches, using structural grass pavers or spaced paver systems with gravel infill to maintain permeability under loading.
For heavy clay soils where percolation is limited, gravel outperforms pavers by eliminating the risk of joint clogging and base course saturation. In sandy loams, permeable pavers offer aesthetic refinement without significant hydraulic disadvantage. The decision hinges on your soil’s percolation test results and traffic load requirements.
The landscaping mistake of building flower beds that trap water against the house walls
The most common residential drainage error occurs at the foundation interface, where aesthetic planting decisions create hydraulic failure. Building raised beds directly against siding, or installing mulch layers that bridge the gap between soil and wall assemblies, establishes capillary wicking paths and hydrostatic pressure zones that guarantee basement intrusion.
Foundation protection requires maintaining a capillary break and negative drainage plane. Water must flow away from the structure at a minimum 5% grade for at least ten feet. When this proves impossible due to site constraints, install decorative river stone channels—applying the Japanese principle of ‘ma’ or negative space—to create a physical and aesthetic separation between planting areas and structural walls.
Vertical greenery solutions eliminate ground moisture while maintaining aesthetic value. Wall-mounted planters, espalier systems, and trellised vines provide the desired softening effect without compromising the building envelope’s integrity.
Foundation Protection Protocol: Essential Drainage Safeguards
- Locate all rain gardens and retention basins at least 10 feet away from building foundations to prevent hydrostatic pressure damage to basement walls and slabs.
- Grade all soil surfaces away from the foundation with a minimum 5% slope (6 inches over 10 feet) to ensure positive drainage.
- Install decorative river stone channels between foundation walls and planting beds to create a permeable capillary break that prevents moisture wicking.
- Utilize wall-mounted planter systems for vertical greenery adjacent to structures, eliminating ground-level moisture sources entirely.
- Maintain a 6-inch vertical gap between finished mulch grade and siding materials to prevent sustained moisture contact with building envelopes.
How to document your drainage improvements to potentially lower your insurance premium?
Engineered landscape drainage represents a risk mitigation investment that may yield financial returns beyond property protection. The National Flood Insurance Program’s Community Rating System (CRS) recognizes private property improvements that reduce watershed-wide flood risk, potentially qualifying homeowners for premium reductions.
Documentation requires systematic record-keeping that proves hydraulic performance. Photograph excavation depths, soil amendments, and overflow mechanisms during installation. Maintain receipts for permeable materials, engineered soils, and professional grading services. Most critically, record percolation test results demonstrating your soil’s improved drainage capacity post-intervention.
Pima County demonstrates that jurisdictions achieving a Class-2 CRS rating can provide property owners with up to a 40% discount on flood insurance premiums. While individual landscape modifications alone rarely achieve these savings, comprehensive documentation of rain gardens, permeable surfaces, and positive grading contributes to community-wide risk scores that trigger these discounts.
Present this documentation to your insurance underwriter as evidence of proactive hazard mitigation. Even without CRS participation, some private insurers offer credits for documented stormwater management systems that reduce basement flooding probability. The key lies in quantifying your improvements—specifying gallons of retention capacity, square footage of permeable surface, and drainage rates—rather than simply listing aesthetic garden features.
Demountable barriers or Landscape grading: Which flood protection alters the site aesthetics less?
When flood risk exceeds what landscape absorption can manage, property owners face a choice between active defense systems and permanent topographic modification. Demountable flood barriers offer temporary protection during specific events, while landscape grading creates permanent berms and swales that alter site hydrology continuously.
Demountable systems minimize visual impact during dry periods. Stored off-site or designed as dual-purpose elements (seating walls that accept flood panels), they remain invisible until deployment. However, they require human intervention, maintenance testing, and potential failure points during catastrophic events when deployment proves impossible.
Landscape grading provides passive protection without operational failure modes. Engineered berms and depressed swales handle flood events automatically while creating planting opportunities and topographic interest. The aesthetic impact varies: grading can appear natural when softened with vegetation, or industrial when formed as concrete floodwalls.
| Feature | Demountable Barriers | Landscape Grading |
|---|---|---|
| Visual Impact When Not in Use | Minimal – Hidden or decorative | None – Natural landform |
| Installation Disruption | Low – Surface mount | High – Major earthwork |
| Design Integration | Can double as seating walls | Creates planting opportunities |
| Maintenance Visibility | Periodic testing visible | Invisible after establishment |
| Property Value Impact | Neutral to positive | Generally positive |
Resilient landscape planning design can help communities live with periodic or even constant flooding, adapting to a new way of life.
– American Society of Landscape Architects, Resilient Design: Flooding
For residential applications, landscape grading generally offers superior long-term value when space permits, while demountable systems suit historic properties where earthwork would compromise architectural integrity.
Why do natural fibers prevent mold better than synthetic foam in old stone walls?
While seemingly unrelated to landscape drainage, the principle of breathability governing historic masonry restoration directly applies to sustainable landscape engineering. Old stone walls fail when moisture becomes trapped by impervious synthetic foams or rubber membranes, creating anaerobic conditions that promote mold and structural degradation. Natural fibers—coir, jute, hemp—maintain hygroscopic equilibrium, allowing moisture to escape while providing structural support.
This principle translates directly to landscape materials. Evidence from soil stabilization projects demonstrates that planting new grass with fibrous root systems reduces flood damage by absorbing water through capillary action, whereas synthetic barriers often create perched water tables that suffocate soils.
Apply breathable material science to your drainage infrastructure. Replace rubber mulch with organic wood chips that allow air circulation and prevent anaerobic decomposition. Substitute coir-log retaining walls for poured concrete edging, creating living shorelines that absorb hydraulic energy while maintaining soil permeability. Install open-graded gravel paths rather than sealed asphalt, and choose permeable joint sand over polymeric sand for paver installations.
Historically, the solution for those who cannot move to higher ground is to build walls, raise homes up on stilts, or simply rebuild. But flood walls tend to be expensive, obstructive, and subject to catastrophic failure.
– ASLA Resilient Design Team, Resilient Design: Flooding
The percolation test remains your diagnostic baseline: excavate a three-foot deep hole, fill with water, and measure drainage time. Completion within twenty-four hours indicates sufficient capacity for absorption-based solutions like rain gardens and bioswales; longer durations mandate elevated or barrier-based approaches.
Key Takeaways
- Diagnose water sources before designing—high water tables require elevation while surface runoff demands calculated absorption capacity.
- Size rain gardens to specific roof measurements (approximately 26% of roof area) adjusted for soil percolation rates.
- Maintain 10-foot buffers and negative grading (5% slope) between planting areas and foundations to prevent capillary moisture intrusion.
- Select breathable natural materials over synthetics to maintain soil and wall hygroscopic equilibrium.
How to Retrofit Historic Monuments to Withstand Increasing Flood Risks?
Historic properties present unique constraints where traditional drainage engineering conflicts with preservation requirements. Retrofitting these structures demands solutions that protect cultural integrity while managing modern hydrological loads—a challenge increasingly relevant as climate volatility escalates.
The “living with water” philosophy, exemplified by Venice and Amsterdam, shifts focus from exclusion to accommodation. Rather than constructing obstructive flood walls that isolate monuments from their context, landscape architects deploy integrated systems that temporarily accept controlled inundation while protecting structural integrity. Rain garden networks surrounding historic districts reduce sewer overflow risks by naturally absorbing stormwater runoff from hardscapes, preventing the backup that typically damages historic foundations.
Effective retrofitting employs reversible interventions: demountable barriers that attach without penetrating historic fabric, elevated walkways that protect ground-level masonry during flood events, and subsurface drainage galleries that lower water tables without altering visible topography. These approaches acknowledge that flood walls tend to be expensive, obstructive, and subject to catastrophic failure when overtopped.
For residential historic properties, prioritize landscape-based solutions that maintain sight lines and material authenticity. Bioswales disguised as historic ha-has, permeable gravel drives consistent with period surfaces, and cisterns hidden within reconstructed outbuildings provide modern hydraulic capacity without compromising heritage values. The goal is resilience through adaptation rather than absolute protection through isolation.
Evaluate your property’s drainage capacity by conducting the three-step diagnostic test, then engineer a landscape system sized to your specific roof runoff and soil percolation rates. Document your improvements to qualify for insurance credits while ensuring all hardscapes and plantings maintain breathable, permeable interfaces with your structure.