Chronic silicosis is an irreversible and fatal lung disease caused by invisible dust, but it is 100% preventable through rigorous, science-backed safety protocols.
- Wet carving methods and local exhaust ventilation are non-negotiable primary defenses that capture dust at its source.
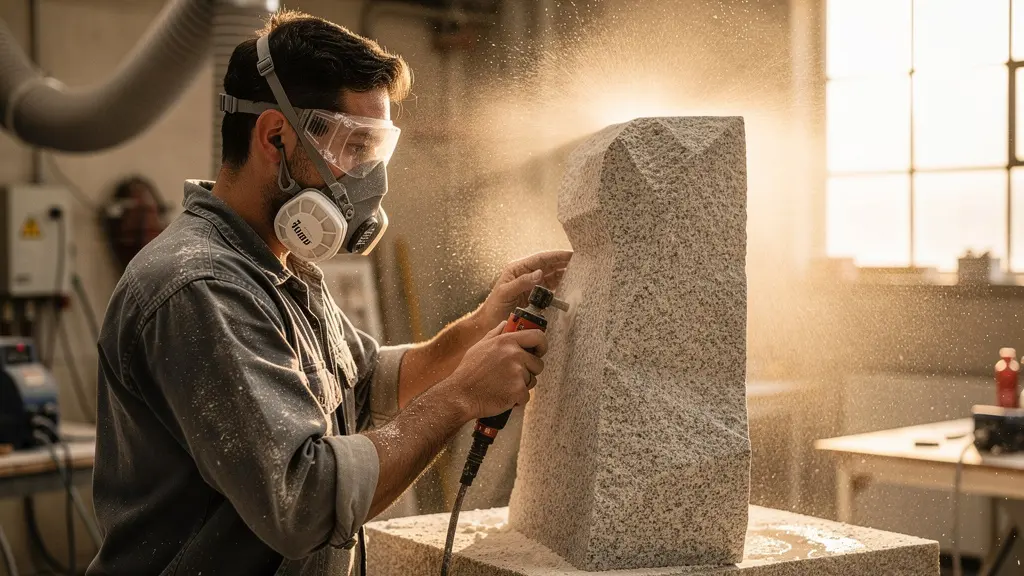
- Respirator choice is critical; half-masks require a clean shave for a proper seal, while PAPR systems are mandatory for artists with facial hair.
Recommendation: Immediately adopt a systemic approach to studio safety that combines environmental engineering controls, appropriate personal protective equipment, and a consistent medical surveillance schedule.
In the quiet of a sculptor’s studio, shafts of light often reveal a dance of dust motes, a seemingly harmless byproduct of creation. Yet, the most lethal threat is the dust you cannot see. For artists working daily with stone like sandstone, quartz, or granite, this invisible menace is Respirable Crystalline Silica (RCS). The standard advice—wear a mask, use water—scratches the surface of a deep and complex problem. These measures are often adopted without a true understanding of their limitations, leading to a false sense of security.
The hard truth is that silicosis, the incurable and progressive lung disease caused by RCS, has a long latency period. By the time symptoms appear, significant and irreversible lung damage has already occurred. There is no cure for silicosis, only management of its debilitating symptoms. Prevention is the only cure. This guide moves beyond simplistic advice to deliver a clear, medical-based framework for total lung protection. The key is not merely to use safety gear, but to fundamentally transform your studio into a controlled environment where dust generation is systematically engineered out of your breathing zone.
This article will dissect the nature of this invisible danger, providing actionable strategies for engineering controls like wet carving and proper ventilation. We will then analyze the critical choices in respiratory protection and establish a non-negotiable schedule for medical monitoring. Finally, we will touch upon other, often overlooked, occupational health risks for the dedicated artist, ensuring a holistic approach to a long and healthy creative career.
This comprehensive guide details the essential pillars of protection for any serious stone carver. The following sections break down each critical component, from understanding the enemy to implementing a life-saving defense system.
Contents: A Sculptor’s Health & Safety Protocol
- Why is silica dust invisible to the naked eye yet deadly after 10 years?
- How to set up a wet carving station in a small studio without flooding it?
- P100 Half-Mask or Powered Air Purifier: Which respirator fits a beard?
- The airflow mistake that blows dust back into your face instead of extracting it
- When to get a chest X-ray: The monitoring schedule for active stone carvers
- Why does sitting “straight up” actually increase pressure on your lumbar discs?
- Why does applying acrylic over oil paint cause cracking within 6 months?
- How to Adjust Your Home Office Setup to Eliminate Lower Back Pain in 30 Days?
Why is silica dust invisible to the naked eye yet deadly after 10 years?
The lethality of silica dust lies in its microscopic size. The particles that cause silicosis are known as Respirable Crystalline Silica (RCS). To be considered “respirable,” these particles must be small enough to bypass the natural filtration systems of your nose and upper airways. According to occupational safety experts, respirable silica particles measure less than 10 micrometers in diameter—less than one-tenth the width of a human hair and completely invisible to the naked eye. When you carve, grind, or cut stone, you generate a cloud of this invisible dust.
Once inhaled, these tiny, sharp particles travel to the deepest part of your lungs, the alveoli, where oxygen exchange occurs. Your body’s immune system responds by sending macrophage cells to engulf the foreign particles. However, the crystalline structure of silica is toxic to these cells, causing them to die and release inflammatory agents. This triggers a cycle of chronic inflammation and scarring. Over years of exposure, this scarring, or fibrosis, builds up, stiffening the lungs and drastically reducing their ability to absorb oxygen. This is silicosis.
The “10-year” timeline refers to the typical latency period for chronic silicosis, the most common form of the disease. It can develop after a decade or more of low to moderate exposure. The tragedy is that this process is asymptomatic in its early stages. By the time shortness of breath, a persistent cough, or fatigue becomes noticeable, the lung damage is extensive and permanent. The stark reality of this danger was highlighted in a recent California study, where 52 engineered-stone workers were diagnosed with silicosis between 2019 and 2022, with ten fatalities at a median age of just 45. It underscores the critical need for prevention, not reaction.
Silica dust is the carbon monoxide of the sculpture studio.
– Georgia Tech Safety Health Environmental Services
This powerful analogy emphasizes that the greatest danger is the one you cannot see, smell, or taste. Trusting your senses is a fatal mistake; only rigorous, science-based controls can protect you.
How to set up a wet carving station in a small studio without flooding it?
The single most effective engineering control to prevent silicosis is to stop dust from becoming airborne in the first place. Wet carving achieves this by using water to suppress dust at the point of tool contact. However, for artists in small or rented studios, the prospect of using water can be daunting, raising fears of flooding, water damage, and slurry management. The solution is not to avoid water, but to implement a controlled, contained wet-working system.
A successful small-studio wet station is built on two principles: controlled water delivery and effective containment. You do not need a firehose-like stream of water; a consistent mist or gentle drip is often sufficient to capture the dust. The goal is to keep the immediate work surface damp, not to drench the entire studio. This minimizes water usage and runoff, making management far easier.
The image below illustrates a compact and efficient setup. The key is a robust containment basin that isolates the wet process from the rest of your workspace, especially from electrical outlets and tools.
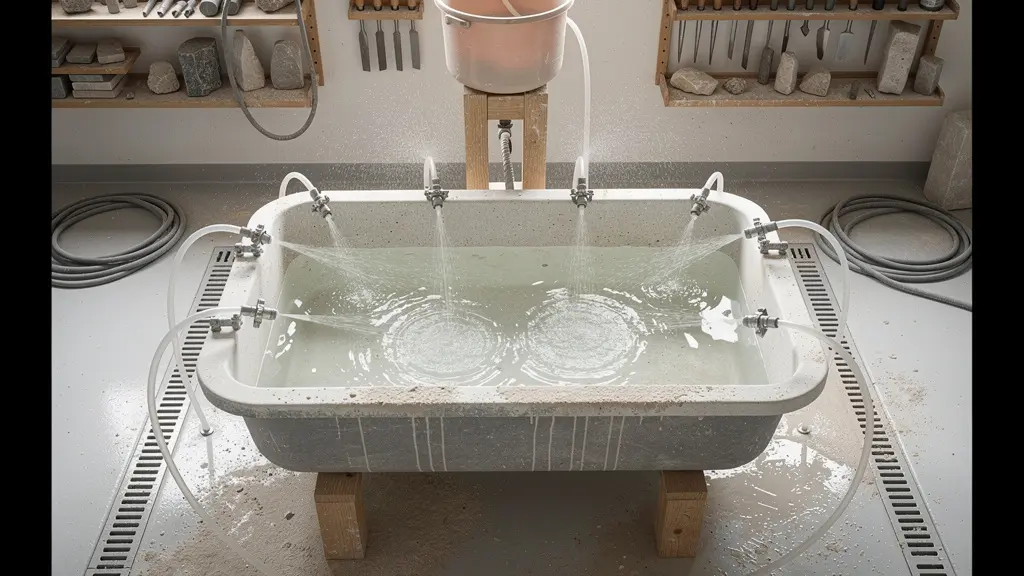
As you can see, a well-designed station can be both effective and space-efficient. By focusing on containment and controlled water flow, you can gain the full protective benefit of wet carving without compromising your studio space. Here are several practical methods for setting up your station:
- DIY Gravity-Drip System: Use an IV bag, a platypus-style hydration bladder, or even a simple garden sprayer suspended above the work area. A tube with a small valve allows you to precisely control a slow drip or mist directly onto your workpiece.
- Closed-Loop Recirculating System: Place a small, inexpensive submersible pump inside a large concrete mixing tub or a modified shower basin. The pump recirculates the water, conserving it and containing the silica-laden slurry within the tub.
- Containment and Isolation: Always position your wet station in a dedicated zone. Use a heavy-duty rubber-lined tray, a mortar mixing tub, or a custom-built shallow basin to act as a containment system, preventing water and slurry from spreading.
- Slurry Management: The collected water and stone sediment (slurry) is hazardous waste. Allow the sediment to settle, then carefully decant the clear water. The remaining sludge should be allowed to dry completely, then bagged and disposed of according to local hazardous waste regulations. Never pour it down the drain.
P100 Half-Mask or Powered Air Purifier: Which respirator fits a beard?
Even with excellent engineering controls, a high-quality respirator is your last and most personal line of defense. The choice, however, is not a matter of preference but of physiological reality, especially for artists with facial hair. The effectiveness of a respirator depends entirely on its seal to the face. Any gap allows contaminated air to bypass the filter.
For a non-powered, tight-fitting respirator like a P100 half-mask, a perfect seal is mandatory. The ‘P100’ rating means the filter is strongly resistant to oil and filters out at least 99.97% of airborne particles. However, this is only true if 100% of the air you breathe passes through the filter. According to NIOSH research, facial hair, even light stubble, can cause 20 to 1000 times more leakage compared to a clean-shaven face. Therefore, for a half-mask to be effective, the user must be clean-shaven in the area where the mask seals against the skin. No exceptions.
For sculptors with beards, the only safe and compliant option is a Powered Air-Purifying Respirator (PAPR). A PAPR works on a principle of positive pressure. A battery-powered blower forces filtered air into a hood or helmet. This creates a higher pressure inside the hood than outside, so any leakage flows outward, not inward. Because it does not rely on a tight seal to the face, it is fully effective for individuals with facial hair.
The following table provides a clear comparison of these two essential systems, with data to inform your decision. As the analysis from safety equipment specialists shows, the choice involves trade-offs in cost, comfort, and protection level.
| Factor | P100 Half-Mask | PAPR (Powered Air Purifying Respirator) |
|---|---|---|
| Beard Compatibility | Requires clean shave for proper seal | Works with facial hair – uses positive pressure |
| Initial Cost | $30-100 | $500-2000 |
| Filter Replacement Cost | $10-30 per pair monthly | $50-100 every 3-6 months |
| Weight | Less than 1 lb | 2-5 lbs with battery pack |
| Field of Vision | Limited peripheral vision | Full field of view with hood/helmet |
| Breathing Resistance | Moderate to high | None – cooling airflow provided |
| Long Session Comfort | Can cause fatigue after 2-3 hours | Comfortable for 8+ hour shifts |
| APF (Assigned Protection Factor) | 10 | 25-1000 depending on design |
The Assigned Protection Factor (APF) is a critical number. An APF of 10 means the respirator will protect you in an environment with up to 10 times the Permissible Exposure Limit (PEL) for a contaminant. The significantly higher APF of a PAPR reflects its superior protective capability, especially for long-duration, high-exposure work.
The airflow mistake that blows dust back into your face instead of extracting it
Many well-intentioned artists believe that “ventilation” means simply moving air around with a shop fan. This is not only ineffective but is often counterproductive and dangerous. Placing a fan behind you to blow dust away from your face creates turbulent airflow, kicking settled dust back into the air and swirling contaminants throughout your entire studio. It transforms a localized hazard into a room-wide problem.
The correct principle for dust control is not dilution ventilation (moving air around) but Local Exhaust Ventilation (LEV), also known as source capture. The goal of LEV is to capture the contaminant at its source before it ever has a chance to enter your breathing zone or contaminate the general workshop environment. This requires creating a zone of negative pressure directly at the workpiece.
The illustration below clearly shows the difference between dangerous, turbulent airflow and effective source capture. The wrong setup uses a fan to push air, while the correct setup uses an extractor to pull air, drawing the dust away from the artist and directly into a collection system.
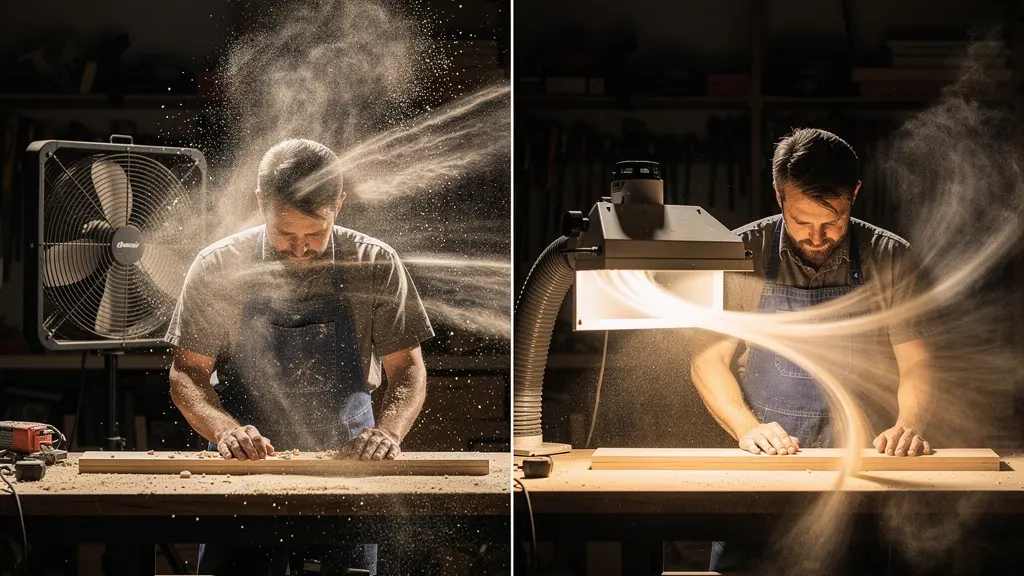
To implement proper LEV, you need a high-efficiency dust collection system. As safety and health network experts advise, the most effective control for silica is a cartridge dust collector that captures contaminants at their source. This system consists of three main components:
- The Hood: This is the point of capture, which must be placed as close as possible to the workpiece—ideally within one foot. The hood’s design (e.g., a fishtail hood) is crucial for creating a wide, effective capture zone.
- The Ducting: Smooth, rigid ducting is essential for maintaining airflow velocity and preventing dust from settling inside the pipes. Flexible hoses should be used sparingly.
- The Collector/Filter: The system must use a high-efficiency filter, such as a HEPA filter, capable of capturing the microscopic RCS particles. A simple shop vacuum is not sufficient and will likely exhaust the smallest, most dangerous particles back into your studio air.
Proper LEV works in concert with wet carving. While water knocks down most of the dust, the LEV system captures the fine aerosolized mist and any particles that escape, forming a nearly impenetrable two-layer defense.
When to get a chest X-ray: The monitoring schedule for active stone carvers
Because silicosis develops silently over many years, you cannot rely on symptoms to tell you there is a problem. The only way to protect your long-term health is through proactive medical surveillance. This is not a sign of hypochondria; it is a professional standard of care for anyone working in a high-risk occupation. A structured monitoring schedule can detect early changes in your lungs, often before you feel sick and when interventions may be more effective at slowing disease progression.
The first signs of silicosis are non-specific and easily dismissed: a nagging dry cough, shortness of breath during exertion that was previously easy, or unusual fatigue. Waiting for these signs means you are already behind. The cornerstone of surveillance includes a baseline examination before you begin regular stone work, followed by periodic tests to track any changes over time.
The U.S. Occupational Safety and Health Administration (OSHA) provides clear guidelines for workers exposed to silica. Under its silica standard, OSHA requires medical surveillance including chest X-rays and lung function tests for any worker exposed at or above the “action level” of 25 µg/m³ for 30 or more days per year. For active carvers, adopting this schedule as a minimum personal standard is a critical investment in your future. It’s important to ensure any chest X-ray is interpreted by a NIOSH-certified “B Reader,” a physician specially trained to detect occupational lung diseases like silicosis.
Your Health Surveillance Action Plan: A Sculptor’s Checklist
- Establish a Baseline: Before starting or continuing significant stone work, get an initial chest X-ray and a pulmonary function test (spirometry). This provides a crucial reference point for all future tests.
- Schedule Periodic Exams: Plan for follow-up examinations at least every three years. This is the minimum standard; your doctor may recommend more frequent testing based on your exposure levels and initial results.
- Track Your Lung Function: Consider annual spirometry tests. This simple, non-invasive test measures your lung capacity and can detect early declines more sensitively than an X-ray, prompting further investigation.
- Heed Warning Signs: Seek immediate medical attention if you experience new or worsening shortness of breath, a persistent cough, or unexplained chest tightness. Do not wait for your next scheduled exam.
- Maintain a Health Log: Keep detailed records of your exposure hours, the types of stone used, your respirator model and filter change schedule, and the dates and results of all your medical tests. This log is invaluable for your physician.
This disciplined approach transforms health from a passive hope into an active practice, giving you the best possible chance at a long, healthy life alongside your art.
Why does sitting “straight up” actually increase pressure on your lumbar discs?
While the focus on respiratory health is paramount, an artist’s career can also be cut short by chronic musculoskeletal injury. A pervasive myth in ergonomics is the command to “sit up straight.” This advice, often envisioning a rigid, 90-degree angle between the torso and thighs, is not only unnatural but can be harmful. It actively increases the pressure on your lumbar intervertebral discs.
Your spine is not a straight rod; it has natural curves. The lumbar spine (lower back) has a natural inward curve called lordosis. When you force yourself to sit in a perfectly upright 90-degree posture, you often flatten this curve. This posture requires constant muscular effort to maintain and significantly loads the anterior (front) portion of your lumbar discs. Studies using pressure sensors inserted into spinal discs have shown that this rigid, unsupported posture generates more pressure than a slightly reclined, supported posture.
The ideal sitting posture is one of a neutral spine. This is not a single position but a range where your spine’s natural curves are maintained and supported. For sitting, this often means a slightly reclined angle of about 100-110 degrees, not 90. This slight recline allows the backrest of your chair to take a significant portion of your upper body weight, unloading the spinal discs and surrounding muscles. The key is to support the lumbar curve with a proper chair or a lumbar pillow, allowing your back muscles to relax while your spine rests in its strong, natural alignment.
For an artist who may be seated for long periods doing detail work, understanding this principle is crucial. Fighting against your body’s natural mechanics leads to fatigue, pain, and eventual injury. The goal is not to be “straight” but to be “supported.”
Why does applying acrylic over oil paint cause cracking within 6 months?
Shifting from physical to material health, a common and catastrophic mistake for multidisciplinary artists is violating the foundational “fat over lean” rule in painting. Specifically, applying a layer of fast-drying acrylic paint over a slow-drying oil paint layer is a chemical recipe for disaster, leading to delamination and cracking within months.
The incompatibility stems from their fundamentally different drying mechanisms and material properties. Oil paint does not “dry” in the conventional sense of water evaporating. It cures through a slow process of oxidation, where the oil molecules absorb oxygen from the air and polymerize, cross-linking to form a tough, durable, but somewhat flexible film. This process can take months or even years to fully complete, and the paint film continues to change and shrink slightly over a very long time.
Acrylic paint, on the other hand, dries very quickly through simple water evaporation. As the water leaves, the acrylic polymer particles fuse together to form a stable, non-porous, and relatively brittle plastic film. When you apply acrylic over an uncured oil layer, you are effectively sealing it off from the air. The oil paint below is now trapped, unable to access the oxygen it needs to cure properly. Furthermore, the oil layer will continue to shift and shrink as it slowly attempts to cure, while the rigid acrylic layer on top cannot accommodate this movement. This differential in flexibility and drying rates creates immense physical stress, causing the top acrylic layer to crack, flake, and peel away from the unstable oil substrate.
The reverse, however, is perfectly acceptable. Applying oil paint over a fully dried acrylic layer (“fat over lean”) is a stable practice. The dried acrylic provides a solid, porous ground that the oil paint can adhere to without issue. Remembering this simple hierarchy—acrylic first, oil second—is essential for the archival quality and longevity of any mixed-media work.
Key Takeaways
- Silica dust under 10 micrometers is invisible and bypasses the body’s defenses, leading to irreversible lung scarring (silicosis).
- Wet carving and Local Exhaust Ventilation (LEV) are primary engineering controls that are far more effective than relying on PPE alone.
- A clean-shaven face is mandatory for a half-mask respirator; artists with beards must use a Powered Air-Purifying Respirator (PAPR) system for effective protection.
How to Adjust Your Home Office Setup to Eliminate Lower Back Pain in 30 Days?
For many artists, the “home office” is also the design station, the administrative desk, or the digital sculpting space. Applying the biomechanical principles we’ve discussed, you can systematically eliminate the common causes of lower back pain by making three targeted adjustments to your workspace ergonomics. This is not about buying an expensive new chair, but about correctly configuring what you already have.
The goal is to create a setup that supports a neutral spine, minimizing strain on your discs and muscles. This 30-day plan focuses on creating new habits by adjusting your environment. It’s a practical application of treating your body with the same precision you apply to your art. The pain you feel is a signal that your current setup is forcing your body into a compromised, unsupported position. By addressing the root causes, relief is not only possible but probable.
Commit to these three ergonomic adjustments for the next 30 days. You will be retraining your body and establishing a foundation for a pain-free creative practice.
- Master Your Chair (Weeks 1-2): First, adjust your chair height so your feet are flat on the floor and your knees are at roughly a 90-degree angle. Next, address lumbar support. Your chair should have a curve that fits into the small of your back. If it doesn’t, roll up a towel and place it there. Finally, recline your chair backrest slightly to about 100-110 degrees to unload your spine. Spend the first two weeks consciously returning to this supported posture whenever you notice yourself slouching.
- Elevate Your Gaze (Week 3): Neck and upper back posture are directly linked to lower back strain. Position your primary monitor so that the top of the screen is at or slightly below eye level. This prevents you from craning your neck down or forward. If using a laptop, get an external keyboard and mouse and place the laptop on a stand or a stack of books to raise its screen to the proper height.
- Incorporate Micro-Movements (Week 4): Static posture is the enemy. Even a perfect posture, held for too long, will cause discomfort. Set a timer for every 30 minutes. When it goes off, simply stand up, stretch your arms overhead, do a gentle backbend, and sit back down. This tiny break is enough to decompress your spine and reset your posture, preventing the cumulative strain that leads to chronic pain.
By systematically building these habits, you are not just relieving pain; you are investing in the physical longevity required for a lifetime of creative work.
Your art should be a source of legacy, not a cause of illness. Begin today by conducting a full safety audit of your workspace, from air quality to ergonomics, to ensure your health is as enduring as your creations.