The greatest challenge in adapting a home for aging parents is the fear of creating a cold, clinical environment. The solution lies not in adding medical devices, but in seamlessly integrating universal design principles. This approach focuses on making safety features like support bars and appropriate lighting look like intentional, high-end design choices, preserving the home’s warmth and style while ensuring comfort and independence for years to come.
The decision to renovate a home for an aging parent or for your own future is an act of love and foresight. Yet, it’s often shadowed by a significant concern: How do we introduce necessary safety features without erasing the home’s character and warmth? The common image of accessible design is one of sterile, hospital-grade equipment—stark white grab bars, bulky plastic chairs, and jarringly bright lights. This clinical aesthetic feels like a surrender of personal style and the comfort of a space filled with memories.
Many well-intentioned guides focus purely on function, listing requirements for grab bars, non-slip mats, and wider doorways. While these elements are crucial for safety, this narrow focus misses the heart of the issue. A home is not a medical facility; it is a sanctuary. The true goal is to create an environment that is not just safe, but also dignified, beautiful, and empowering. It’s about enhancing, not diminishing, the quality of life within its walls.
But what if the key wasn’t a choice between safety and style, but a fusion of the two? This is the core of modern aging-in-place philosophy: embedding universal design principles so flawlessly that safety and aesthetics become indistinguishable. It’s about thinking like a designer, not just a caregiver. The most effective accessibility features are often the ones you don’t notice until you need them, because they are already part of the home’s inherent beauty and logic.
This guide will walk you through the principles of creating a home that is both a safe haven and a stylish retreat. We will explore how to reframe functional necessities as design opportunities, from transforming doorways and lighting to selecting furniture and flooring, ensuring the result is a space that supports independence with elegance and grace.
To help you navigate these design-forward solutions, this article covers key areas where safety and style can converge. Explore the sections below to discover practical strategies for creating a sophisticated and supportive home environment.
Summary: How to Renovate a Home for Graceful Aging
- How to Retrofit Doorways for Walkers Without Tearing Down Load-Bearing Walls?
- Grab Bars vs. Reinforced Towel Rails: Which Safety Feature Looks Intentional, Not Medical?
- Why Seniors Need 3x More Light to Read and How to Provide It Without Glare?
- The Flooring Texture Mistake That Creates a Tripping Hazard for Shuffling Gaits
- When to Install a Stairlift: Why Waiting Until a Fall Happens Is the Wrong Strategy
- Why Does Sitting “Straight Up” Actually Increase Pressure on Your Lumbar Discs?
- How to Program Your Lights to Fade From Blue to Warm White Automatically at Sunset?
- How to Set Up Smart Lighting Scenes That Improve Sleep and Save Energy?
How to Retrofit Doorways for Walkers Without Tearing Down Load-Bearing Walls?
One of the first and most daunting challenges in adapting a home is ensuring easy passage through doorways, especially with a walker or wheelchair. The conventional wisdom often involves costly and disruptive construction to widen frames, which is particularly complex with load-bearing walls. However, before resorting to demolition, several clever, less invasive solutions can reclaim precious inches and make a world of difference. The goal is to create clear, unobstructed paths that feel open and welcoming, not like a series of tight squeezes. Accessibility guidelines often recommend doorways be 36 to 40 inches wide, but even a couple of extra inches can dramatically improve maneuverability.
The most effective strategy is to start with the hardware. Simple changes can yield surprising results. Consider these options:
- Offset Hinges: These Z-shaped hinges are a game-changer. By moving the door’s pivot point, they allow it to swing completely clear of the doorway, instantly adding up to two inches of usable space without touching the frame.
- Door Removal: In high-traffic areas between living spaces (like a living room and dining room), consider removing the door entirely. This creates a permanent, open archway that enhances flow and light. For privacy, a stylish curtain or a pocket door can be an elegant alternative.
- Swing-Clear Doors or Barn Doors: If hinges and trim removal are not enough, modern door solutions offer both function and style. Swing-clear doors are designed for accessibility, while a beautifully crafted barn door can become a design centerpiece, sliding along a wall and leaving the entire doorway free.
These modifications prioritize invisible accessibility, enhancing function without signaling a “medical” retrofit. They are thoughtful adjustments that improve the home’s flow for everyone, demonstrating that thoughtful design can solve practical problems with elegance.
Grab Bars vs. Reinforced Towel Rails: Which Safety Feature Looks Intentional, Not Medical?
The bathroom is a critical area for safety, and the grab bar is its most notorious emblem. The image of a clinical, institutional-looking bar can be a major source of resistance for homeowners who cherish their home’s aesthetic. The secret to overcoming this is to stop thinking about “installing a grab bar” and start thinking about “adding a beautifully designed, structural support.” The focus shifts from a medical necessity to an intentional design element that offers stability. This is the essence of integrated safety: function that is so well-disguised in beautiful form that the medical association vanishes completely.
Instead of a standard chrome bar, a world of designer options now exists that double as other functional, stylish fixtures. This approach makes the safety feature look completely deliberate.
Case Study: Designer Grab Bars as Architectural Features
The most successful bathroom renovations incorporate support that looks like a luxury upgrade. Designer grab bars are now available in finishes like matte black, brushed gold, or oil-rubbed bronze, allowing them to coordinate with faucets and other hardware. Furthermore, their form has evolved. A professional can install models that seamlessly double as toilet paper holders, corner shower shelves, or even minimalist towel rails. When a high-contrast material like a matte black bar is set against classic white tile, it ceases to be a medical device and becomes a bold, graphic design statement.
This image demonstrates how a support feature can enhance, not detract from, a bathroom’s design. The hand rests naturally on a bar that feels more like a part of a luxury spa than a hospital.
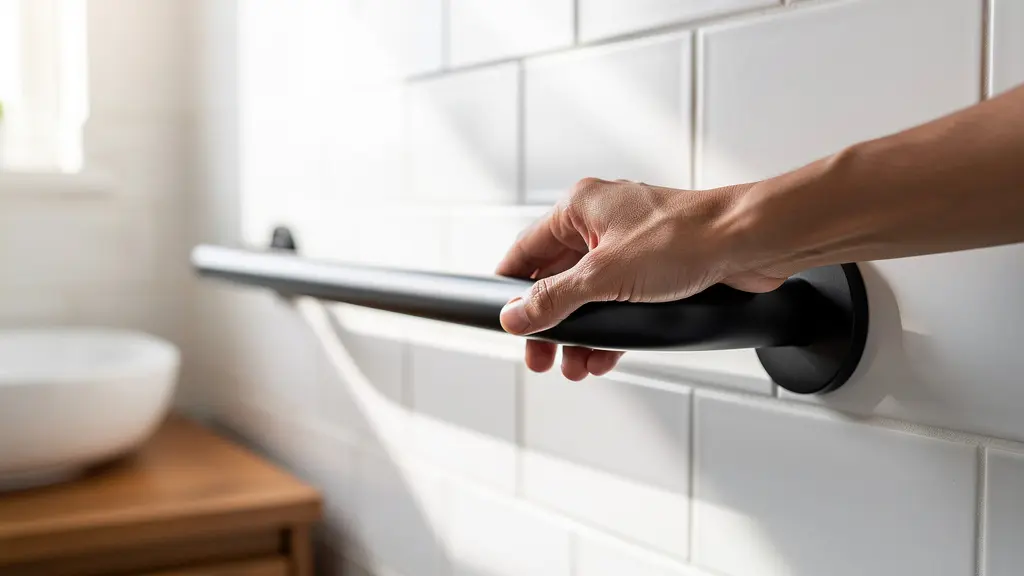
The key is proper installation. A grab bar, no matter how beautiful, is useless if it’s not anchored securely into wall studs or with appropriate blocking. Always hire a professional to ensure these features can support significant weight. By choosing a dual-purpose, high-design option and ensuring it’s installed correctly, you add a layer of safety that is both effective and aspirational.
Why Seniors Need 3x More Light to Read and How to Provide It Without Glare?
As we age, the lenses in our eyes thicken and yellow, and our pupils don’t dilate as widely. The physiological result is startling: an 80-year-old may require up to three times more ambient light than a 20-year-old to see the same level of detail. Simply adding more light, however, is not the answer. Aging eyes are also far more sensitive to glare, which can be debilitating and even dangerous. The solution is not just about quantity; it’s about the quality and strategic placement of light. A well-lit home for a senior is about creating layers of light that are bright where needed, soft elsewhere, and always, always glare-free.
A multi-layered lighting plan is the most effective approach. This involves combining ambient (general), task (focused), and accent lighting to create a flexible and comfortable environment. The goal is to eliminate dark corners and harsh shadows, which can obscure tripping hazards or cause disorientation. By bouncing light off ceilings and walls, you can create a soft, even illumination that is easy on the eyes.
The following table outlines key lighting solutions that deliver brightness without the blinding glare, creating an environment that’s both safe and welcoming.
| Lighting Type | Benefits | Recommended Placement |
|---|---|---|
| LED Lights (2700K-3000K) | Energy-efficient, provides warm, comfortable light and reduces blue light glare. | Throughout home in overhead fixtures and lamps. |
| Motion Sensor Lights | Provides automatic, hands-free illumination for safe navigation, preventing falls. | Hallways, stairways, bathrooms, and entryways. |
| Task Lighting | Delivers focused, bright light for reading, cooking, and hobbies without illuminating the whole room. | Under kitchen cabinets, next to reading chairs, and over workbenches. |
| Uplighting | Bounces light off the ceiling to create soft, diffuse, and completely glare-free ambient light. | Living rooms and bedrooms via floor lamps or wall sconces. |
Finally, putting all lights on dimmer switches is a simple but powerful modification. It gives the user ultimate control to adjust light levels based on the time of day, the activity, or their personal comfort, making the home’s lighting truly responsive and supportive.
The Flooring Texture Mistake That Creates a Tripping Hazard for Shuffling Gaits
When selecting flooring for an aging-in-place renovation, the obvious goal is to choose a non-slip surface. However, a common mistake is to overlook the subtle but critical factor of texture, especially for individuals who may develop a shuffling gait. A shuffle, where the feet do not lift fully off the ground, creates a constant, low-level friction with the floor. While a high-friction surface is good for preventing slips on wet floors, a surface with too much “grip” or texture can be a significant tripping hazard. The edge of a shoe can easily catch on plush carpet pile or a rough tile, leading to a stumble or fall.
The ideal flooring strikes a delicate balance: it must provide enough friction to be safe but be smooth enough to allow feet to glide without catching. This is where technical specifications become important. For slip resistance, especially in areas like bathrooms, look for flooring with a high Dynamic Coefficient of Friction (DCOF) rating. The American National Standards Institute (ANSI) recommends a DCOF rating of 0.42 or higher for level interior spaces expected to be walked upon when wet. However, this must be paired with a physically smooth surface.
Another crucial, often-missed element is visual contrast. High-contrast patterns or abrupt transitions in flooring color (e.g., from a dark wood to a light tile) can be misinterpreted by aging eyes as a step or an obstacle, causing a person to hesitate or trip. A continuous, low-contrast floor surface creates a clearer, more easily navigable path.
Your Action Plan: Flooring Safety Checklist
- Evaluate Transitions: Identify and remove all high-contrast flooring transitions that could be misinterpreted as steps. Aim for a single, continuous surface where possible.
- Check Material Specs: Choose materials like matte porcelain, luxury vinyl tile (LVT), or cork that have a documented DCOF rating of over 0.42 for wet areas.
- Assess Carpet Pile: Avoid thick, plush, high-pile carpets. If carpet is desired, opt for low-pile (less than 1/2 inch high) or flat-woven rugs that offer cushion without a tripping hazard.
- Secure All Rugs: Ensure any area rugs are secured with high-quality, non-slip rug pads to prevent them from bunching or sliding.
- Inspect for Levelness: Check the entire floor for levelness. Fix any gaps between tiles, warped floorboards, or uneven surfaces that could catch a toe.
By focusing on both the technical slip-resistance and the physical smoothness of the surface, you create a foundation for the home that is both aesthetically seamless and fundamentally safe.
When to Install a Stairlift: Why Waiting Until a Fall Happens Is the Wrong Strategy
Stairs often become the single biggest barrier to remaining in a multi-story home. For many families, the conversation about a stairlift only begins after a fall or a close call. This reactive approach is a critical mistake. It turns the installation into an urgent, stressful, and often compromised decision made under duress. The most forward-thinking and cost-effective strategy is to be proactive. Planning for vertical mobility should be part of any major renovation, long before it becomes an absolute necessity. This allows for thoughtful integration that preserves the home’s design integrity.
This proactive mindset is championed by accessibility experts. As Vince Butler, a builder specializing in aging-friendly homes, stated in a report for AARP Livable Communities, waiting is a flawed strategy:
The time to install “aging-friendly” features in a home is when it’s being built or remodeled — regardless of the age of the current or potential residents. Waiting until something in particular is needed is often too late.
– Vince Butler, AARP Livable Communities
Modern stairlifts bear little resemblance to the bulky, clinical models of the past. Today’s slimline designs feature customizable rail colors to match walls or trim and a wide array of seat fabrics to complement home decor, as shown below.
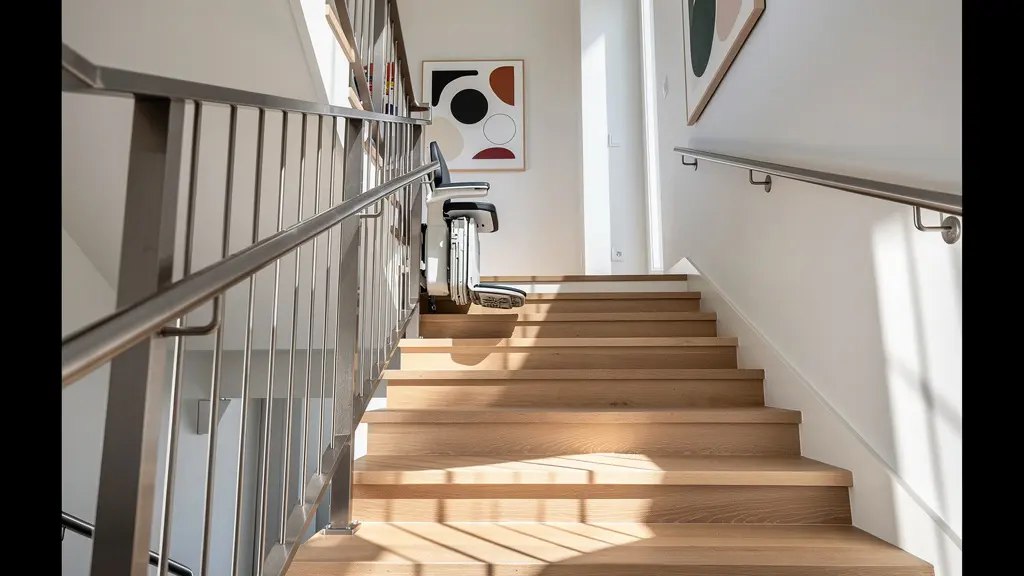
Case Study: The Proactive Stairlift Strategy
A cost-effective and design-savvy approach is to install the rail system during a staircase renovation, even if the chair itself isn’t needed for years. The rail can be custom-painted to blend in with the wall or woodwork, becoming a subtle architectural detail. This pre-installation is far less disruptive and expensive than a post-crisis retrofit. Later, when mobility needs change, the compatible chair can be purchased and easily mounted onto the existing rail, providing an almost instant solution without turning the home into a construction zone.
By planning ahead, the stairlift becomes a planned feature, not a panicked addition. This respects both the home’s design and the resident’s dignity, providing peace of mind and ensuring the home remains a comfortable sanctuary for a lifetime.
Why Does Sitting “Straight Up” Actually Increase Pressure on Your Lumbar Discs?
From a young age, we’re told to “sit up straight” for good posture. While slouching is certainly detrimental, the command to maintain a rigid, 90-degree angle is actually misguided and can cause more harm than good, especially for seniors. When you sit in a perfectly upright posture, you are fighting gravity, which significantly increases the pressure on the lumbar discs in your lower back. This can lead to pain, stiffness, and long-term discomfort. The ideal posture for minimizing spinal load is not bolt upright, but slightly reclined.
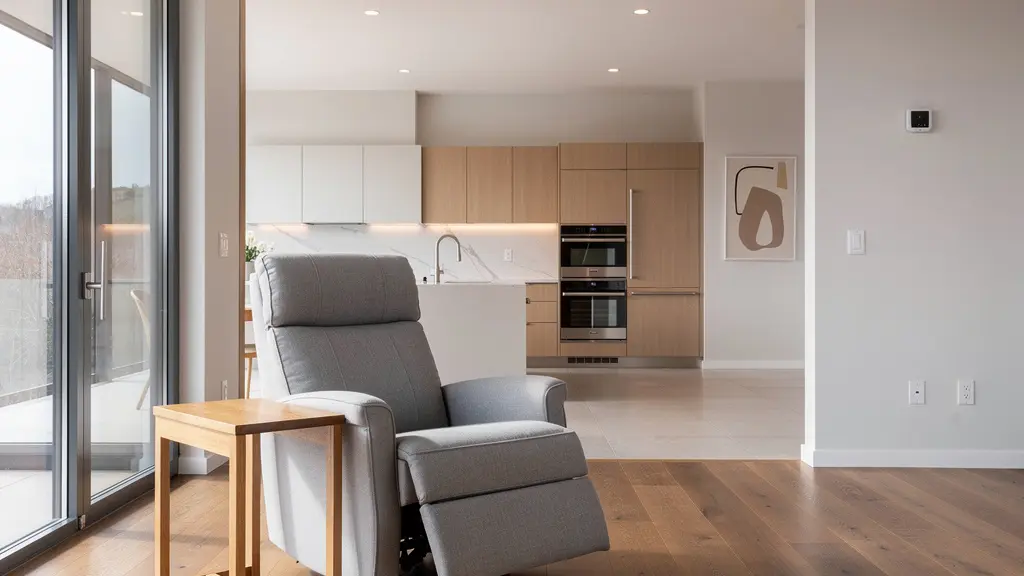
Research into spinal biomechanics shows that a 110- to 130-degree reclined posture significantly reduces the pressure on lumbar discs compared to sitting at 90 degrees. This gentle recline allows the backrest of the chair to support the upper body’s weight, taking the strain off the spinal muscles and discs. This principle is crucial when selecting seating for a living room or reading nook. The goal is to find furniture that encourages this supportive, open-angle posture naturally, without looking like a piece of medical equipment.
Ergonomic Seating That Feels Like Home
The best seating choices combine ergonomic support with residential style. Look for chairs with a seat height of 17-19 inches, which makes the motion of sitting down and standing up significantly easier by reducing the distance one has to travel. Sturdy, easy-to-grip armrests provide a stable leverage point. Beyond that, upholstered rocking chairs and recliners with good, built-in lumbar support are excellent choices. They naturally promote a slightly reclined posture and the gentle motion can help improve circulation and prevent stiffness. The key is to choose stable, well-built furniture with soft, rounded edges to prevent bumps and bruises.
By prioritizing furniture that is both stylish and biomechanically sound, you can create a comfortable and inviting living space that actively contributes to health and well-being, proving that ergonomic support and beautiful design can, and should, coexist.
How to Program Your Lights to Fade From Blue to Warm White Automatically at Sunset?
Beyond simple brightness, the color of light has a profound impact on our bodies’ internal clocks, or circadian rhythms. Exposure to cool, blue-toned light in the morning (mimicking the dawn sky) promotes alertness and energy. Conversely, exposure to warm, amber-toned light in the evening signals the brain to produce melatonin, preparing the body for sleep. For seniors, and especially for individuals with dementia, maintaining this natural rhythm is crucial for regulating sleep patterns and reducing evening agitation, a phenomenon known as “sundowning.”
Thanks to modern smart home technology, you can automate this process, creating a lighting environment that dynamically supports the body’s natural cycle. This is an example of invisible accessibility at its best—a technological intervention that works silently in the background to improve health and well-being. Using tunable white smart bulbs, you can program a home’s lighting to shift automatically throughout the day. Studies have shown that a gradual transition of 15-30 minutes from cool to warm light around sunset is particularly effective.
Setting this up is more straightforward than it sounds. Here is a basic plan for implementing a circadian lighting system:
- Install Tunable Smart Bulbs: Replace standard bulbs in main living areas and bedrooms with smart LED bulbs capable of changing color temperature (e.g., Philips Hue, Wyze Bulb Color, or similar brands).
- Connect to Your Network: Download the manufacturer’s corresponding app on a smartphone or tablet and follow the instructions to connect the bulbs to your home’s Wi-Fi network.
- Create a “Natural Light” Routine: Within the app, look for an automation or routine setting. Create a new routine that gradually shifts the light’s color temperature from a cool white (around 5000K) during the day to a very warm white (around 2700K) in the evening.
- Automate Based on Sunset: Set the routine to be triggered automatically based on the local sunset time. Most smart lighting apps can access this information and adjust daily.
- Fine-Tune the Transition: Program the fade from cool to warm light to occur gradually over a 15 to 30-minute period to ensure the change is subtle and not jarring.
This simple automation provides a powerful, non-pharmacological tool to support healthier sleep cycles and create a calming evening environment, all while being completely integrated into the home’s daily rhythm.
Key Takeaways
- Integrate, Don’t Add: The most successful aging-in-place designs embed safety features into the home’s architecture and decor, making them invisible until needed.
- Prioritize Light Quality: Go beyond brightness. Use layered, glare-free lighting and automated color temperature shifts to support both vision and natural sleep cycles.
- Design Proactively: Plan for future needs during any renovation. Installing blocking for future grab bars or a rail for a future stairlift is far more cost-effective and less disruptive than an emergency retrofit.
How to Set Up Smart Lighting Scenes That Improve Sleep and Save Energy?
Beyond automating circadian rhythms, smart lighting offers a powerful way to enhance both safety and independence through pre-programmed “scenes.” A scene is a saved lighting configuration that can be activated with a single command—whether a tap on an app, a voice command, or a physical smart button. For seniors, this technology removes the need to navigate a dark room to find a light switch or fumble with multiple lamps. It puts control of the entire home’s environment at their fingertips, offering immense peace of mind and reducing the risk of falls.
Creating these scenes is an exercise in intentional design, anticipating daily needs and creating simple, elegant solutions. For example, a “Goodnight” scene could turn off all the main lights in the house while leaving a hallway light dimmed to 15% for safe passage to the bathroom. This not only enhances safety but also saves energy by ensuring no lights are left on accidentally.
Independence Through Voice Activation
For ultimate ease of use, smart lighting scenes can be paired with voice assistants like Amazon Alexa or Google Assistant. This allows a senior to control their environment completely hands-free. Saying “Alexa, I’m home” could turn on the entryway and living room lights to a welcoming warm glow. Similarly, if they are settled in bed and forgot to turn off the kitchen light, a simple “Hey Google, turn off all lights” solves the problem without them needing to get up. This hands-free control is incredibly empowering, fostering a strong sense of independence and control.
The table below provides a few examples of useful scenes that can be easily programmed to make a home safer, more comfortable, and more energy-efficient.
| Scene Name | Settings | Benefits |
|---|---|---|
| Safe Passage | Sets hallway and bathroom lights to 15% brightness, warm white. | Enables safe nighttime navigation to the bathroom without causing disruptive glare. |
| Good Morning | Slowly fades on bedroom lights over 15 minutes, shifting from warm to cool white. | Provides a gentle, natural wake-up experience that helps regulate the sleep cycle. |
| All Off | A single command that turns off all connected lights in the home. | Offers peace of mind and significant energy savings, ensuring no lights are left on. |
By leveraging this accessible technology, you transform the home’s lighting from a simple utility into an active, responsive system that supports a safe and independent lifestyle.
By thoughtfully applying these design-centric principles, you can create a home that is profoundly safe, deeply comfortable, and uncompromisingly beautiful. The next step is to begin planning your renovation not as a list of required modifications, but as a creative project to design a home for a lifetime.