Restoring dead soil is not about adding fertilizers, but about rebooting a living, self-sustaining ecosystem beneath your feet.
- Soil health is determined by its biological structure (the “fungal scaffolding”), not just its chemical composition.
- Synthetic inputs act like “fast food” that damages this structure, while organic matter and cover crops build and feed it.
Recommendation: Shift your focus from “feeding plants” to “cultivating the soil food web,” and your garden will thrive.
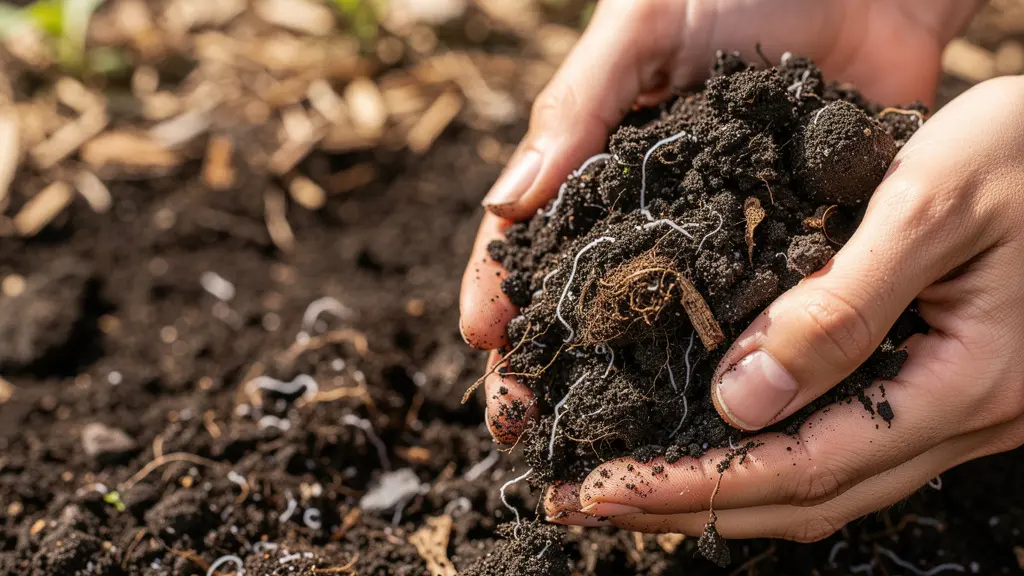
That patch of ground in your backyard is a source of constant frustration. It’s either compacted clay that sheds water like a rooftop or sandy dust that refuses to hold moisture. Plants struggle, yields are disappointing, and it feels like you’re fighting a losing battle. You’ve heard the common advice: add more fertilizer, till in some compost, maybe try a different mulch. But these feel like temporary fixes, not a true solution. The soil remains stubbornly lifeless, a mere substrate for holding up plants rather than a thriving partner in their growth.
This is because most conventional gardening advice treats soil as a chemical equation to be balanced with N-P-K inputs. It misses the most crucial element: life. Dead soil lacks the bustling, microscopic community—the soil food web—that is responsible for creating structure, cycling nutrients, and defending plants against disease. Without this living infrastructure, any amendments you add are just a short-term patch on a systemic problem.
But what if the true key to regeneration wasn’t about constantly adding things, but about creating the conditions for life to return and build the system for you? This is the core of the permaculture approach. It’s a paradigm shift from feeding plants to cultivating the complex, resilient ecosystem of the soil itself. It’s about becoming a soil steward, not just a gardener. By understanding the principles that govern this underground world, you can transform dead dirt into a dark, crumbly, carbon-rich sponge teeming with life.
This guide will walk you through the essential permaculture strategies to do just that. We will explore how to diagnose your soil’s true condition, stop the practices that harm its biology, and implement techniques that rebuild its living framework from the ground up. Prepare to think like a soil microbiologist and see your garden in a completely new light.
Table of Contents: A Permaculture Path to Living Soil
- How to read a soil test result to understand exactly what minerals are missing?
- Why synthetic fertilizers act like “fast food” and starve soil biology in the long run?
- Mushroom Compost or Animal Manure: Which adds structure to clay soil faster?
- The rototilling mistake that destroys the fungal network you are trying to build
- When to plant clover: The winter timing that fixes nitrogen for your spring tomatoes
- Why do exotic flowers fail to feed native bee larvae even if they have nectar?
- The landscaping mistake of building flower beds that trap water against the house walls
- How to Grow a Year’s Worth of Vegetables in a Small Urban Backyard?
How to read a soil test result to understand exactly what minerals are missing?
The first step in any regeneration project is diagnosis. When you receive a soil test, the natural tendency is to look at the N-P-K levels and see what fertilizer to buy. A permaculture practitioner, however, looks at it as a habitat assessment for the soil food web. The most critical information isn’t about raw nutrients, but about the minerals that build the physical home for microbes: the bio-structure of the soil itself. The key relationship to examine is the ratio of calcium to magnesium (Ca:Mg).
Calcium and magnesium are both essential, but they have opposite effects on soil structure. Calcium ions help soil particles clump together, creating stable aggregates with plenty of air and water pockets—a process called flocculation. This is the crumbly, cottage-cheese texture of healthy soil. Magnesium, on the other hand, makes soil particles disperse, leading to compaction, poor drainage, and a lack of oxygen. While you need both, an excess of magnesium relative to calcium creates a hostile environment for the fungal and bacterial life you want to encourage.
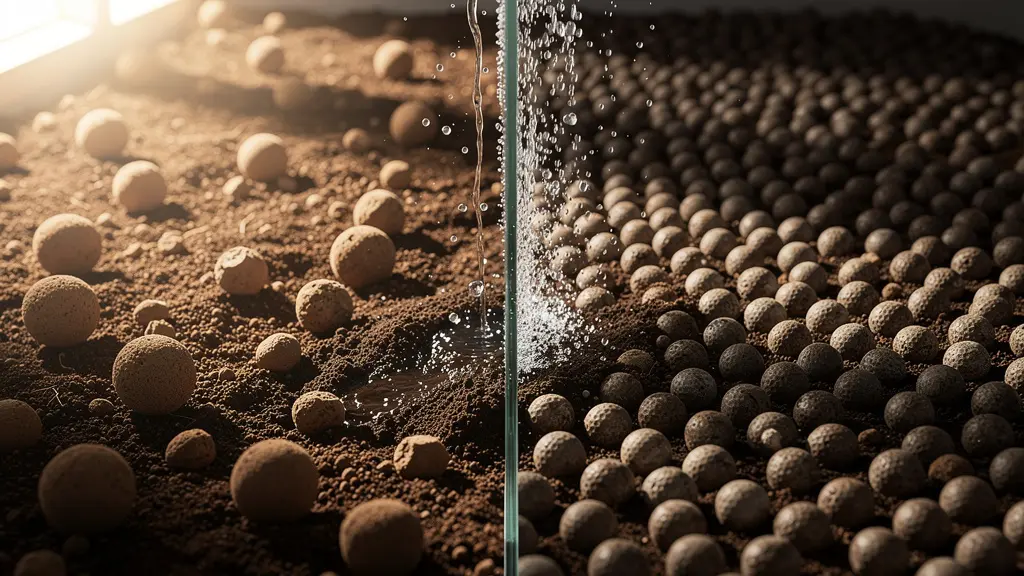
As the image illustrates, a well-structured soil with proper calcium levels allows for air and water penetration, essential for roots and microorganisms. An imbalanced soil, often high in magnesium, becomes tight and lifeless. The ideal Ca:Mg ratio generally falls between 2:1 and 8:1. Don’t panic if your numbers aren’t perfect; real-world data shows most soils are within a functional range. For instance, a long-term analysis of soil tests in one Michigan county found the average Ca:Mg ratio for these Chippewa County soil tests was 3.14, demonstrating that severe imbalances are less common than often feared. The goal is not chemical perfection but creating a functional, breathable structure.
Why synthetic fertilizers act like “fast food” and starve soil biology in the long run?
In our quest for lush gardens, it’s tempting to reach for a bag of synthetic fertilizer. It promises rapid growth, and it often delivers—at first. But from a soil biology perspective, these water-soluble chemicals are like a diet of sugary fast food. They provide a quick, isolated hit of nutrients directly to the plant, completely bypassing the soil’s natural digestive system: the soil food web. This convenience comes at a steep, long-term cost to the health of your garden’s ecosystem.
When plants are fed a constant diet of readily available synthetic nutrients, they stop investing energy in their partnership with soil life. They reduce the output of root exudates—sugary compounds they normally release to attract and feed beneficial bacteria and fungi. In return for these exudates, the microbes would normally mine the soil for minerals and water, delivering them to the plant in a balanced, bio-available form. By cutting out the middleman, you effectively lay off the entire microbial workforce. The population of beneficial organisms dwindles, and the natural nutrient cycling process grinds to a halt.
Furthermore, synthetic fertilizers are salts. Their application increases the soil’s salinity, which can dehydrate and kill sensitive microorganisms through osmotic shock. Over time, this “nutrient dumping” approach degrades the very structure of the soil. Without the sticky glues produced by fungi and bacteria (like glomalin) to bind particles together, soil aggregates break down, leading to compaction, erosion, and a reduced capacity to hold water and air.
This table, based on comparative research, starkly contrasts the long-term effects of these two approaches. It shows how organic methods foster a resilient ecosystem while synthetics lead to dependency and degradation.
| Parameter | Synthetic Fertilizers | Organic Amendments |
|---|---|---|
| Nutrient Release | Immediate (hours to days) | Gradual (weeks to months) |
| Salt Index Effect | High EC levels trigger osmotic shock | Minimal salt accumulation |
| Microbial Response | Initial spike then decline | Steady population growth |
| Root Exudate Production | Reduced by ‘luxury consumption’ | Maintained or increased |
| Long-term Soil Structure | Degradation of aggregates | Enhanced aggregation via glomalin |
As scientific analysis consistently demonstrates, choosing organic amendments is a direct investment in building a robust, self-sustaining soil ecosystem that pays dividends for years to come.
Mushroom Compost or Animal Manure: Which adds structure to clay soil faster?
When faced with heavy, compacted clay soil, the go-to solution is to “add organic matter.” But not all organic matter is created equal. The question isn’t simply about adding bulk, but about providing the right food for the right kind of microbial life. For breaking up clay, you need to foster a robust fungal network. This leads to a common question: is mushroom compost or animal manure better for the job? The answer is both, but for different reasons and at different times. It’s about a strategic inoculation, not just a simple addition.
Animal manure is generally considered “hot” and bacterially dominated. It’s rich in simple proteins and nitrates that fuel a rapid bloom of bacteria. This process generates heat and is fantastic for kick-starting decomposition and providing a quick nutrient boost. In contrast, spent mushroom compost is “cool” and fungally dominated. It’s rich in complex carbons like lignin and cellulose—the woody materials that fungi excel at breaking down. These fungi create extensive networks of mycelial hyphae that act like a net, physically pulling clay particles together into large, stable aggregates. This is the “fungal scaffolding” that transforms dense clay into a well-structured, breathable soil.
Therefore, the fastest way to build structure is not to choose one over the other, but to use them in sequence. A winter application of hot manure can help break up the clay through freeze-thaw cycles, while a spring application of fungal-rich mushroom compost inoculates the soil with the organisms needed to build long-term structure. This combination provides both the initial disruption and the long-term biological construction crew. This approach has proven effective even in the most degraded soils, turning barren land into productive ecosystems by focusing on building biomass and fungal life.
Action Plan: Building Structure in Clay Soil
- Winter Application: Apply a layer of fresh, ‘hot’ animal manure over your clay soil in late autumn. The freeze-thaw cycles of winter will work with the initial decomposition to create micro-fissures in the compacted clay.
- Spring Inoculation: Once the soil warms to about 50°F (10°C), add a 2-inch layer of aged mushroom compost. This introduces a powerful dose of fungal spores and the glomalin needed to bind soil.
- Layering Strategy: For best results, place the mushroom compost as the top layer, with any remaining manure underneath. This encourages the fungi in the top layer to grow downwards, seeking the nitrogen in the manure.
- Monitor Fungal-to-Bacterial Ratio: For advanced gardeners, consider a soil microscopy test. Clay soils need a fungal-to-bacterial (F:B) ratio of 2:1 or higher for optimal aggregation. Your amendments should be chosen to push the ratio in this direction.
- Assess Structure Monthly: Perform a simple slake test. Take a small, dry clod of soil and place it in a jar of water. If it holds its shape, your aggregates are stable and your fungal network is thriving. If it dissolves into a cloud, you need more carbon-rich, fungal food.
The rototilling mistake that destroys the fungal network you are trying to build
You’ve spent the season layering on compost and mulch, carefully cultivating the delicate life in your soil. Then spring comes, and with the best of intentions, you fire up the rototiller to mix it all in and create a “perfect” seedbed. In that single act, you have unleashed an earthquake, a hurricane, and a wildfire on the microscopic city you were trying to build. Tilling is perhaps the single most destructive action one can take against a developing soil food web, especially the crucial fungal network.
The long, thread-like hyphae of mycorrhizal fungi form a vast, interconnected web that is the primary architect of good soil structure. This “fungal scaffolding” binds soil particles into stable aggregates, creates channels for air and water, and acts as a nutrient superhighway, transporting minerals and moisture to plant roots far beyond their own reach. When a rototiller churns through the soil, it shears these delicate filaments into microscopic fragments, obliterating the entire network in an instant. It’s the equivalent of demolishing every road and communication line in a city. The soil structure collapses, and the biology must start over from scratch.
This constant destruction is a primary driver of soil degradation worldwide. This isn’t just an abstract concept; this process has devastating, large-scale consequences. It’s a key reason why global agriculture is facing a crisis. The solution, however, isn’t a rigid, dogmatic “no-till” approach that is impractical for a home gardener with compacted soil. The key is to think in terms of minimal disturbance. As one soil expert puts it, we need to move beyond binary thinking.
The disturbance gradient concept challenges binary ’till vs. no-till’ thinking – micro-tillage through broadforking creates preferential pathways that accelerate fungal establishment without hyphal severing.
– Dale Strickler, The Complete Guide to Restoring Your Soil
Tools like a broadfork or a digging fork allow you to gently lift and aerate the soil without inverting the layers or shredding the fungal network. This creates the air channels needed for root growth while preserving the biological infrastructure. It’s a form of “micro-tillage” that works with the soil’s biology, not against it, ensuring the life you’ve cultivated can continue its essential work.
When to plant clover: The winter timing that fixes nitrogen for your spring tomatoes
Cover cropping is a cornerstone of regenerative gardening, but its true power lies in precision and timing. Simply scattering some seeds in the fall is a good start, but to truly leverage a cover crop, you must see it as a living, biological tool for nutrient delivery. Planting crimson clover, for example, isn’t just about preventing winter erosion; it’s about growing a slow-release nitrogen fertilizer in place, timed perfectly for the needs of your hungriest summer crops, like tomatoes.
Clover, like other legumes, forms a symbiotic relationship with rhizobia bacteria in its root nodules. These bacteria pull atmospheric nitrogen—a gas unavailable to plants—and “fix” it into a solid, plant-available form. Throughout its growth, the clover accumulates this nitrogen in its biomass. The magic happens when you terminate the cover crop. As the clover decomposes, this stored nitrogen is released back into the soil, becoming available for the next crop. The key is timing the termination so that this nitrogen release peak coincides with the moment your tomatoes need it most: during their flowering and initial fruit set.
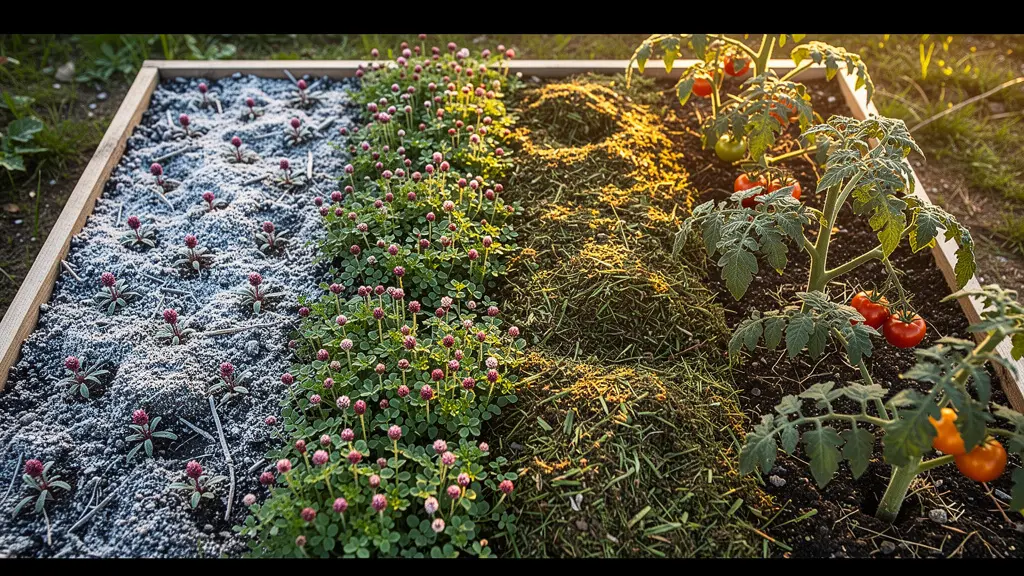
As the visual progression shows, this is a planned, seasonal succession. The clover is seeded in the fall to establish before winter. It grows vigorously in the cool, wet weather of early spring, actively fixing nitrogen. The crucial decision is when to terminate it. Chopping the clover and leaving it on the surface as a mulch (a “chop-and-drop” method) about two to three weeks before you transplant your tomatoes is often ideal. This gives the soil microbes enough time to begin decomposition and start the nitrogen release. More advanced methods even use “Growing Degree Days” (GDD), a measure of heat accumulation, to precisely predict the peak of nitrogen availability, ensuring your tomatoes get their most important meal right on schedule.
This approach transforms the cover crop from a passive groundcover into an active participant in your garden’s nutrient cycle. You are not just adding fertilizer; you are orchestrating a natural process to deliver nutrients exactly when and where they are needed.
Why do exotic flowers fail to feed native bee larvae even if they have nectar?
A thriving garden is an ecosystem, and restoring soil life has benefits that ripple outwards, far beyond the patch of dirt itself. Healthy soil supports healthy native plants, which in turn support native pollinators. However, a common mistake is to fill our beautifully restored soil with exotic, ornamental flowers. While they may be beautiful and produce nectar for adult bees, they often represent an ecological trap, failing to provide the specific nutrition required for the next generation of pollinators.
The problem lies in the pollen. While nectar is essentially a sugar-rich “energy drink” for adult bees, pollen is the complete protein, fat, and micronutrient meal required to raise their young. Native bees have co-evolved over millennia with native plants, and their larvae are adapted to the unique nutritional profile of native pollen. Many exotic flowers, bred for color and form rather than ecological function, produce what scientists call “empty calorie” pollen.
Recent research highlights this critical difference. As a study published in *Scientific Reports* reveals, the pollen from many non-native ornamental plants is severely deficient in the essential amino acids—specifically isoleucine, arginine, and histidine—that native bee larvae need for proper development. According to the research on native bee nutrition, bees foraging on these exotic species may bring back copious amounts of pollen, but it lacks the building blocks for their offspring to grow. The result is a decline in bee populations, even in a flower-filled garden.
This creates a nutritional desert where it appears to be an oasis. To truly support the entire ecosystem, our planting choices must be as thoughtful as our soil amendments. Prioritizing native plant species ensures that the life we cultivate above ground is as well-fed and resilient as the life we’ve restored below it. It completes the circle, turning our garden into a truly regenerative and life-sustaining space.
The landscaping mistake of building flower beds that trap water against the house walls
Permaculture teaches us to see problems as opportunities and to work with natural flows, not against them. A common landscaping mistake beautifully illustrates this principle: the raised flower bed built directly against a house’s foundation. While aesthetically pleasing, this design often traps water, leading to a perpetually soggy bed and, more dangerously, potential moisture damage to the foundation walls. The conventional solution is to install expensive French drains to carry the “problem” water away. A permaculture approach, however, asks: how can we use that water as a resource?
Instead of viewing the trapped water as a threat, we can see it as a valuable source of irrigation. The goal is to reshape the area to hold water in the soil, away from the foundation, and use living plants to manage it. This involves converting the problematic bed into a shallow bioswale or a “water battery.” By digging a shallow channel about 18 inches from the foundation and filling it with woody debris and rich soil, we create a sponge that captures runoff. This is a form of Hugelkultur, where decaying wood absorbs and slowly releases moisture.
To further protect the foundation, a “capillary break” can be installed. This is a simple 4-inch layer of coarse sand placed at the foundation’s edge, which physically stops moisture from wicking sideways into the wall. The final and most elegant step is to plant the swale with “transpiration pumps”—thirsty native plants like Joe Pye Weed or native sedges that are adapted to wet conditions. These plants will actively draw moisture out of the soil and release it into the air, effectively dewatering the area while providing beautiful habitat. This living system is far more resilient and cost-effective than concrete and plastic drains.
- Map Water Flow: Observe your foundation during a rainstorm to identify exactly where water accumulates.
- Create a Diversion Swale: Dig a shallow channel, roughly 18 inches away from the foundation wall, designed to intercept and hold water.
- Install a Capillary Break: At the edge of the foundation, dig a small trench and fill it with a 4-inch layer of coarse sand to stop moisture from moving towards the wall.
- Plant “Transpiration Pumps”: Select high-water-use native plants that thrive in moist conditions and plant them in the bottom of your newly created swale.
- Mulch Heavily: Apply a thick, 6-inch layer of wood chips over the entire area. This will feed the soil biology, suppress weeds, and retain moisture in the swale, keeping it away from the foundation.
Key Takeaways
- Focus on Soil Structure: Prioritize the calcium-to-magnesium ratio on your soil test to build a breathable habitat for microbes, rather than just focusing on N-P-K.
- Feed the Biology, Not the Plant: Use a strategic combination of “bacterial” manure and “fungal” compost to inoculate your soil with the life it needs to create its own fertility.
- Protect the Fungal Network: Abandon the rototiller. Use a broadfork for aeration to preserve the delicate mycelial web that is the backbone of your soil’s structure and nutrient highway.
How to Grow a Year’s Worth of Vegetables in a Small Urban Backyard?
Bringing all these principles together, the ultimate goal for many gardeners is food sovereignty: the ability to grow a significant amount of one’s own food, even in a small urban space. This may seem like a daunting task, especially when starting with dead soil. The secret, however, lies in a radical shift of perspective. In the first year of a regenerative garden, your primary crop is not vegetables. Your primary crop is soil. By dedicating space and time to cultivating a deep, carbon-rich, living soil, you create the engine that will power abundant harvests for years to come.
This is more critical than ever, as modern industrial agriculture has not only degraded our soil but also the nutritional content of our food. Alarming data shows that, due to soil depletion, the level of every nutrient in our food has fallen by 10% to 100% in the last 70 years. Growing your own food in living soil is a direct way to reclaim that lost nutrition for your family.
One of the most effective strategies for this is the “Soil Factory” method. Urban gardeners implementing this approach dedicate a significant portion of their space—up to 60% in the first year—to growing biomass crops. These are fast-growing plants like comfrey, sorghum-sudangrass, or a mix of cover crops that are repeatedly chopped and dropped. This massive infusion of organic matter feeds the soil food web at an accelerated rate, rapidly building the soil carbon sponge. This initial investment in building the soil factory creates a foundation so fertile that in subsequent years, the area can support hyper-intensive vegetable production with minimal external inputs.
Case Study: The Soil Factory Method
The principle is based on the immense biological power of healthy soil, where there are more microorganisms in a single teaspoonful than there are people on Earth. By focusing the first year’s efforts on feeding this population, gardeners create a system of profound fertility. In years two through five, the space previously used for biomass production becomes the site for intensive vegetable growing, while a smaller, rotating section of the garden is always dedicated to ongoing biomass production. This treats soil carbon as the primary yield, with nutritious food becoming the inevitable and abundant byproduct.
Frequently Asked Questions on How to Restore Life to Dead Soil Using Permaculture Principles?
What is phenological mismatch in pollinator relationships?
It’s the timing disconnect between the blooming peaks of exotic flowers and the hatching dates of native bee larvae. This creates nutritional deserts during critical windows of their development, as the right food source (native pollen) is not available when the young need it most.
How does floral constancy disruption affect bee efficiency?
Exotic flowers often have complex shapes or structures that native bees are not adapted to. This increases the “handling time” for each flower, reducing their overall foraging efficiency. It can also encourage “nectar robbing,” where bees chew a hole at the base of the flower to get the nectar without performing pollination, disrupting the plant-pollinator relationship.
Can bridge planting solve pollinator nutrition gaps?
Yes, “bridge planting” is a key strategy. It involves the strategic succession planting of different native species to ensure there is a continuous and overlapping sequence of blooms throughout the seasons. This provides a consistent source of the correct pollen, bridging any nutritional gaps that might occur in the life cycles of local bee populations.
Start today by taking one small step. Go outside, grab a handful of your soil, and truly look at it. Is it life-filled or lifeless? Then, choose one principle from this guide—stop tilling, plant a small patch of clover, or start a compost pile—and commit to it. The journey of soil regeneration is the most rewarding one a gardener can take, transforming not just your backyard, but your relationship with the living world beneath your feet.