The long-term survival of your mixed media art depends not on artistic intuition, but on understanding and preventing chemical warfare between your materials.
- Most failures, like cracking and delamination, result from predictable physical and chemical incompatibilities, such as different drying rates and acid migration.
- Archival success is achieved by building a structurally sound and chemically stable “system” of layers, from the support to the final varnish.
Recommendation: Shift your focus from simply “making art” to “engineering an artwork.” Document every material and test for compatibility before committing it to a final piece.
An artist invests emotion, time, and skill into a mixed media piece, only to see it crack, yellow, or delaminate years later. This is a common and deeply frustrating experience. The usual advice often involves vague recommendations like “use quality materials” or “let it dry properly.” While not incorrect, this guidance barely scratches the surface of a much deeper issue: the complex and often destructive chemical reactions happening within the layers of your artwork.
These pieces are not inert objects; they are active chemical systems. The paper ephemera, metallic elements, oil paints, and acrylic gels you combine are all interacting. Some materials, like acidic newspaper, are veritable chemical time bombs, slowly releasing compounds that degrade everything around them. Others have fundamentally different physical properties, leading to a constant state of tension that results in structural failure.
But what if the key to creating lasting art wasn’t just following a set of rules, but understanding the material science behind them? This article moves beyond generic tips to provide a chemist’s perspective on archival stability. We will not just tell you *what* to do, but explain *why* certain combinations fail and how to engineer your artworks for true longevity. It’s about preventative conservation, built into your creative process from the very first layer.
This guide will dissect the most critical chemical and physical challenges you’ll face. We will examine the precise mechanisms behind common failures and provide scientifically-backed strategies to ensure the structural and chemical integrity of your work for decades to come.
Summary: The Material Science of Archival Mixed Media
- Why does applying acrylic over oil paint cause cracking within 6 months?
- How to glue metal or wood to canvas so it doesn’t fall off in 5 years?
- The acidification risk of using newspaper clippings without a buffer layer
- Spray Fixative or Brush Varnish: Which seals charcoal and pastel layers effectively?
- How to conduct a lightfastness test on cheap craft supplies before using them?
- Damar or Synthetic: Which varnish is less likely to yellow over 20 years?
- When to stop adding layers: Knowing when an emotional piece is finished
- How to Varnish Oil Paintings to Avoid the Clouding Effect on Dark Colors?
Why Does Applying Acrylic Over Oil Paint Cause Cracking Within 6 Months?
This is the cardinal sin of mixed media for a fundamental reason: incompatible drying mechanisms. Acrylic paint dries by evaporation, forming a non-porous, plastic-like film. Oil paint, conversely, “dries” through a much slower process of oxidation and polymerization, where it absorbs oxygen from the air to cure into a hard, cross-linked film. When you apply a fast-drying, inflexible acrylic layer over a still-curing, flexible oil layer, you create a system destined for failure. The oil layer continues to shift, expand, and contract as it oxidizes, but the rigid acrylic layer on top cannot accommodate this movement. This differential stress inevitably leads to catastrophic cracking and delamination.
The reverse, applying oil over acrylic, is generally more stable but still requires caution. The acrylic substrate must be fully cured (which can take days or weeks for thick applications) to provide a stable base. Furthermore, the oil paint should have sufficient flexibility. Research shows that adding 5% or more of medium to oil paints, such as linseed oil or an alkyd medium, significantly improves flexibility and reduces the risk of cracking when applied over an acrylic ground. Working on an inflexible support like a wood panel instead of a stretched canvas also helps minimize the mechanical stress on the paint films.
How to Glue Metal or Wood to Canvas so It Doesn’t Fall Off in 5 Years?
The failure of adhered objects is a matter of structural mechanics and adhesive chemistry. A flexible, stretched canvas is an unstable foundation for heavy, rigid elements like wood or metal. Over time, changes in temperature and humidity cause the canvas to expand and contract, while the rigid object does not. This continuous, shearing force will eventually break even a strong adhesive bond. The first principle of heavy collage is therefore to work on an unyielding, rigid support like a wood panel or an aluminum composite panel. If you must use canvas, it should be fully mounted to a rigid board first.
The choice of adhesive is the second critical factor. Not all glues are created equal in terms of bond strength, flexibility, and archival quality. A two-part epoxy will create an incredibly strong, rigid bond ideal for metal, but it may be too brittle for a support with any flex. A pH-neutral heavy gel medium is often the professional’s choice, offering a strong, durable bond with enough flexibility to absorb minor movements. The key is to match the adhesive’s properties to both the object and the substrate.
The following table provides a comparative analysis of common adhesives, highlighting their ideal uses and archival properties. When selecting an adhesive, consider not just the initial bond, but its chemical stability and behavior over a 20+ year lifespan. This data, based on extensive artist testing and comparison, is essential for making an informed choice.
| Adhesive Type | Best For | Flexibility | Archival Quality | Drying Time |
|---|---|---|---|---|
| Golden Heavy Gel Medium | Heavy objects, wood, metal | Medium | Excellent | 24-48 hours |
| Liquitex Matte Medium | Paper, lightweight materials | High | Excellent | 2-4 hours |
| Lineco Neutral pH | Archival projects, metal | Medium | Superior | 4-6 hours |
| Fabri-Tac | Heavy items, fabric | Low | Good | 1-2 hours |
| 2-Part Epoxy | Metal, permanent bond | Very Low | Variable | 5-30 minutes |
The Acidification Risk of Using Newspaper Clippings Without a Buffer Layer
Using ephemera like newspaper clippings adds a powerful narrative layer to a work, but from a chemical standpoint, it’s like introducing a corrosive agent. Most modern newsprint is made from ground wood pulp, which is high in a compound called lignin. Over time, lignin breaks down and releases acids. This process is the primary reason why old newspapers turn yellow, become brittle, and eventually disintegrate. In a mixed media context, this is a significant threat to archival longevity.
The released acids are not contained; they will migrate into adjacent materials—the canvas, surrounding papers, and even the paint layers—causing them to yellow and degrade as well. This is known as acid migration. To prevent this, the acidic paper must be chemically isolated from the rest of the artwork. As conservation guides note, acidic papers require special barriers to stop this damaging chemical process. This isn’t just a suggestion; it’s a requirement for any piece intended to last.
The process involves two steps: neutralizing the acid within the paper itself and then creating a physical barrier. De-acidification sprays can neutralize existing acids, but complete encapsulation in a pH-neutral polymer medium is the most effective way to seal the paper and prevent future acid migration. This creates an impermeable “envelope” around the clipping, protecting the surrounding artwork.
Action Plan: De-acidifying and Isolating Ephemera
- Test the pH levels of your paper materials using a pH testing pen on an inconspicuous corner to confirm acidity.
- Apply a de-acidification spray, such as Bookkeeper, to neutralize the inherent acids in the newspaper or other ephemera.
- Create a complete encapsulation by applying a pH-neutral gel medium to the front, back, and all cut edges of the paper, sealing it entirely.
- As an added precaution, consider using archival barrier sheets or paper between the treated ephemera and other valuable or sensitive materials.
- Document all materials and conservation steps used in your process for any future restoration work.
Spray Fixative or Brush Varnish: Which Seals Charcoal and Pastel Layers Effectively?
When dealing with friable (powdery) media like charcoal or pastels, the primary goal is to lock the pigment particles in place without altering their appearance. This is a delicate mechanical process. The common mistake is to move directly to a brush-on varnish. However, as conservation specialists advise, this is a flawed approach. The liquid in the varnish, combined with the mechanical action of the brush, will re-wet and disturb the loose particles, leading to smearing, muddying of colors, and a complete loss of detail. The warning from experts is clear:
A brush loaded with liquid varnish will re-wet and lift/smear loose pastel or charcoal particles, no matter how carefully applied.
– Conservation specialist, Mixed media preservation best practices
The correct method is a multi-stage approach using spray applications. The first step is to use a workable spray fixative, applied in several very light, even coats from a distance. This gently binds the top layer of particles without saturating them. This can be done between layers as you work. Once the composition is complete, a final, non-workable spray fixative provides a more robust, but still isolated, seal.
Only after the friable media is fully locked down by a spray fixative should you consider a brush-on layer. Even then, it’s best practice to first apply an “isolation coat”—a clear, non-removable acrylic medium—which acts as a permanent barrier between your artwork and the final removable varnish. This layered strategy ensures the structural integrity of the loose pigments while providing the ultimate surface protection offered by a removable varnish.
How to Conduct a Lightfastness Test on Cheap Craft Supplies Before Using Them?
Not all pigments are created equal. Artist-grade paints are rated for lightfastness (their resistance to fading when exposed to light), but many cheaper craft supplies use “fugitive” pigments that can fade, shift color, or disappear entirely in a matter of months. Incorporating these materials into a serious artwork without testing is a gamble with the piece’s long-term survival. A lightfastness test is a simple, scientific procedure any artist can conduct to verify the archival quality of their materials.
The process involves creating test swatches of each color on archival paper. It is critical to label each swatch meticulously with the brand, color name, and date. Then, cover exactly half of each swatch with something completely opaque, like black electrical tape or a piece of card. This covered half will be your control. Place the test sheet in a location with maximum sun exposure, like a south-facing window. For a standard test, you should leave it for at least 3 to 6 months. For faster results, a DIY lightbox with a UV-A bulb can provide an accelerated test in just a few weeks.
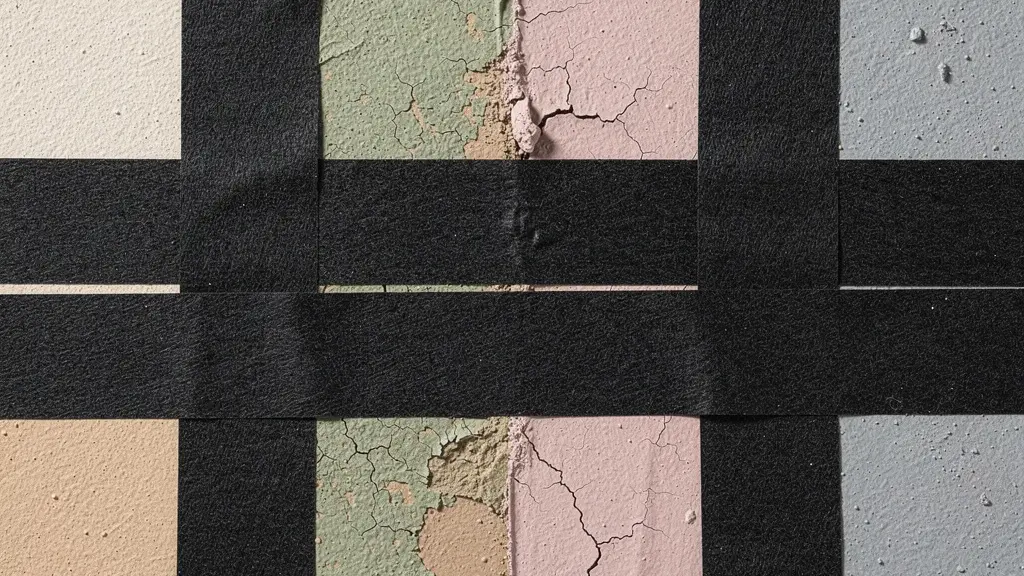
After the exposure period, remove the opaque covering. The results will be immediately obvious. A stable, lightfast pigment will show little to no difference between the exposed and unexposed halves. A fugitive pigment will show dramatic fading on the exposed side. It’s important to document not just fading, but also other changes like color shifts (e.g., a blue turning grey), embrittlement of the paint film, or changes in sheen. Any material that shows significant change should be deemed non-archival and avoided for permanent work.
Damar or Synthetic: Which Varnish Is Less Likely to Yellow Over 20 Years?
The final varnish layer serves two purposes: to unify the surface sheen and to provide a removable, protective barrier against dust, grime, and UV light. The choice of varnish has significant long-term implications. For centuries, natural resins like Damar were the standard. However, from a chemical perspective, Damar is inherently unstable. It is a natural tree resin that continues to oxidize over time, causing it to cross-link, yellow, and become brittle. After several decades, it becomes extremely difficult and risky for a conservator to remove without damaging the underlying paint.
Modern chemistry has provided a far superior alternative: synthetic varnishes. Varnishes like those based on mineral spirit acrylic (MSA) resins or other synthetic polymers are engineered for stability. They are prized for their clarity and, most importantly, their non-yellowing properties. But their greatest advantage is removability. These modern formulations are designed to be easily removed by a conservator using mild solvents, even after 50 years or more. This allows an artwork to be cleaned and re-varnished, effectively renewing its protective layer without endangering the original art. This principle of removability is a cornerstone of modern art conservation.
The choice between Damar and a synthetic like Gamvar or Golden MSA Varnish is a choice between a traditional material with known flaws and a modern material engineered for archival longevity. For any artist concerned with the long-term preservation of their work, the scientific evidence overwhelmingly favors synthetic varnishes. It is also a reminder that even the paint itself can have inherent flaws; for instance, historical use of zinc oxide (PW4) in oil paint is now known to cause embrittlement and adhesion issues over time, a separate material science problem to be aware of.
When to Stop Adding Layers: Knowing When an Emotional Piece Is Finished
The question of when a piece is “finished” is often framed in emotional or aesthetic terms. However, from a material science perspective, there is a much more concrete and practical answer. Each layer of paint, gel, or collage element adds physical weight and internal stress to the artwork’s structure. As you build up layers, you also risk trapping solvents or moisture, creating weak points between layers that can lead to future delamination. An acrylic pour, for example, can craze or crack if the top layer dries much faster than the still-wet layers beneath it, a clear sign the material’s limits have been breached.
These material behaviors are not failures to be painted over; they are communications. The materials themselves tell you when they have reached their limit. The point of completion is not just an aesthetic decision but a structural one. A mixed media conservation specialist offers a starkly practical definition:
The piece is ‘finished’ when adding another layer would compromise its structural integrity.
– Mixed media conservation specialist, Fast Frame Fine Art preservation guide
This shifts the focus from “Does it look done?” to “Is it structurally sound?”. An artwork is finished when it has reached a state of stable equilibrium. Pushing beyond that point by adding one more heavy object or one more thick, incompatible layer introduces a point of failure that will reveal itself over time. Respecting the physical limits of your materials is as crucial as any compositional choice you make. The most emotionally resonant piece will be lost if its physical structure collapses.
Key Takeaways
- Embrace Material Science: The longevity of your art is determined by chemistry and physics, not just aesthetics. Understand the properties of every material you use.
- Prioritize Structural Integrity: A stable, rigid support is the foundation of a lasting mixed media piece. Build your layers from flexible to rigid (“fat over lean”) and respect the drying/curing times for each.
- Isolate and Protect: Use fixatives, isolation coats, and buffer layers as chemical barriers to prevent destructive reactions between incompatible materials like acidic paper or friable pigments.
How to Varnish Oil Paintings to Avoid the Clouding Effect on Dark Colors?
Applying a final varnish to an oil painting should be a moment of triumph, but it can turn to disaster if a milky, cloudy film appears, especially over dark passages. This phenomenon, known as “bloom,” is caused by moisture being trapped within or under the varnish layer as it dries. The moisture condenses into microscopic droplets, scattering light and creating a hazy appearance. This is not a chemical reaction with the paint, but a physical problem caused by an improper varnishing environment.
To prevent this, you must control the environment. The most critical factor is humidity; you should never varnish on a damp or rainy day when the relative humidity is high (ideally, it should be below 60% RH). Both the painting and the varnish should be at the same room temperature to prevent condensation. Furthermore, the oil painting must be thoroughly cured—not just touch-dry. This can take 6 to 12 months or even longer for thick impasto. Varnishing too early traps solvents that are still off-gassing from the oil paint, which can also cause clouding.
The application technique is also vital. It’s always better to apply two or three very thin, even coats rather than one thick coat. A thick coat is more likely to trap moisture and solvents, and it takes much longer to cure, increasing the window for dust and debris to become embedded. Always test your varnish on a small, inconspicuous dark area first. If it enriches the color and remains clear, the painting is ready and the conditions are right to proceed with confidence.
By adopting a chemist’s mindset—testing, documenting, and understanding the “why” behind each material interaction—you are no longer simply making an object for the present. You are engineering an archival work with the structural and chemical integrity to endure for generations.