Effective smart lighting isn’t about buying cool bulbs; it’s about building a coherent ecosystem from the network up.
- Network stability (Zigbee vs. Wi-Fi) is the non-negotiable foundation for a reliable system.
- Programming for wellness is a science based on circadian rhythms, not just a simple “warm light at night” setting.
- True cost and security risks are real but entirely manageable with the right strategy.
Recommendation: Start by auditing your home’s network infrastructure before you even think about which brand of smart bulb to buy.
You’ve unboxed your new Philips Hue or LIFX bulbs, installed the app, and played with the color wheel. The promise of a truly “smart” home feels within reach. Yet, for many tech-savvy homeowners, the reality soon sets in: a jumble of disconnected apps, lights that mysteriously drop off the network, and the nagging feeling that you’re only scratching the surface. The default “Relax” and “Concentrate” scenes are a start, but they feel generic, failing to deliver on the core promises of improved wellness and real energy efficiency. The dream of a home that intuitively adapts to your life gives way to the frustration of a system that feels more complicated than intelligent.
The internet is full of simple advice: “use warm light at night” or “set a ‘Goodnight’ scene.” This is the equivalent of being told to “eat healthy” without a recipe. It’s not wrong, but it’s fundamentally incomplete. A truly effective smart lighting strategy goes far beyond the bulb itself. It’s a holistic ecosystem that must be designed with intention, starting from the invisible radio waves in your home and extending to the precise color temperature that cues your brain for sleep. The key isn’t just dimming the lights; it’s about engineering your environment.
This guide takes a home integrator’s approach. We’ll bypass the superficial tips and focus on the foundational pillars that make a smart lighting system genuinely smart. We will deconstruct the technology choices, explore the science behind circadian-friendly lighting, and address the often-overlooked factors of standby power consumption and network security. By the end, you won’t just have scenes; you’ll have a strategy—a blueprint for a lighting system that actively enhances your well-being and respects your budget.
This article is structured to build your expertise from the ground up, covering the essential technical, practical, and lifestyle considerations for creating a truly intelligent lighting environment. Explore the sections below to master each component of your smart home ecosystem.
Summary: Smart Lighting Scenes: A Home Integrator’s Guide to Better Sleep and Energy Savings
- Zigbee vs. Wi-Fi: Which lighting system won’t crash your home internet network?
- How to program your lights to fade from blue to warm white automatically at sunset?
- The standby power draw of smart bulbs: Why they might not save as much money as you think
- The security flaw in cheap smart bulbs that gives hackers access to your Wi-Fi
- How to create a “sunrise simulation” that actually wakes you up gently?
- The lighting error that disrupts your circadian rhythm in windowless corners
- Why do solar lights dim by 50% when the battery gets cold?
- How to Arrange a 400 Sq Ft Apartment to Reduce Daily Stress Levels?
Zigbee vs. Wi-Fi: Which lighting system won’t crash your home internet network?
Before you choose a single bulb, you must choose your network foundation. This is the single most critical decision for a stable smart lighting system. The primary choice is between Wi-Fi-based bulbs and those using a mesh protocol like Zigbee (used by Philips Hue) or its next-generation successor, Thread. Wi-Fi bulbs are appealingly simple; they connect directly to your home router. However, this is their biggest weakness. Every bulb is another device competing for bandwidth on your already crowded 2.4GHz Wi-Fi network, which is shared by your laptop, phone, and streaming devices. Add ten, twenty, or more bulbs, and you’re creating a recipe for network congestion, dropped connections, and unresponsive lights.
Zigbee, on the other hand, creates its own dedicated, low-power mesh network. Each bulb acts as a repeater, strengthening the signal for other bulbs and extending the network’s range. This system operates independently of your Wi-Fi, ensuring that your Netflix stream isn’t affected by you turning on the kitchen lights. This isolation is crucial for reliability and scale. While it requires a dedicated hub or bridge, this is a feature, not a bug; it’s the central brain that keeps your lighting ecosystem robust and separate. Furthermore, emerging protocols are even more efficient; for instance, a recent analysis shows that Thread-based Matter bulbs consume up to 20% less power in idle states than their predecessors, making the case for dedicated mesh networks even stronger.
For tech-savvy homeowners, the answer is clear: for any installation of more than a few bulbs, a hub-based Zigbee or Thread system is superior. If you must use Wi-Fi bulbs, the only responsible way is to create a dedicated network for them. This isolates their traffic and protects your primary network’s performance. It’s the professional integrator’s approach to building a reliable smart home foundation.
Action Plan: Set Up a Dedicated IoT Network
- Access your router’s admin panel and look for ‘Guest Network’ settings to isolate smart devices.
- Create a new 2.4GHz network specifically for IoT devices like smart bulbs.
- Name it clearly (e.g., ‘SmartHome_IoT’) and set a strong, unique password.
- Enable network isolation if available; this prevents devices on the guest network from accessing your main network.
- Connect all smart bulbs and other IoT gadgets to this dedicated network, leaving your main Wi-Fi for high-bandwidth devices.
How to program your lights to fade from blue to warm white automatically at sunset?
Programming your lights to mimic the sun is the cornerstone of a wellness-focused smart home. It’s not just about dimming; it’s about “circadian engineering.” Throughout the day, natural sunlight shifts in color temperature, measured in Kelvin (K). Bright, midday sun is high in blue light (around 5000-6500K), which promotes alertness. As the sun sets, the light becomes much warmer, shifting to orange and red tones (below 3000K). This absence of blue light signals your brain to produce melatonin, the hormone that prepares you for sleep. A smart lighting system can replicate this transition automatically, creating a “personal sunset” inside your home.
Most smart lighting apps (like Philips Hue) allow you to create automations based on the actual sunset time in your location. The key is to create a gradual, multi-stage fade rather than an abrupt change. A great starting point is a 90-minute “Golden Hour” sequence before your desired bedtime. You can program a scene that starts 90 minutes before bed with a neutral white light (e.g., 4000K) at 80% brightness. After 30 minutes, it automatically transitions to a warmer white (3500K) at 60%. Thirty minutes later, it shifts to a cozy warm glow (2700K) at 40%. For the final 30 minutes, it can fade to a dim, candlelight-like color (2200K) at just 20% brightness before turning off completely. This slow, deliberate reduction of both brightness and blue light content is a powerful, non-intrusive way to prepare your body for restful sleep.

As this visualization shows, the goal is to create a seamless environmental shift. This isn’t a single “night mode” but a dynamic process. By automating this gentle transition, you remove the need for willpower or clock-watching. Your environment simply adapts, guiding your internal body clock towards its natural sleep cycle. This is where smart lighting transcends convenience and becomes a genuine wellness tool, aligning your indoor world with the ancient rhythms of the sun.
The standby power draw of smart bulbs: Why they might not save as much money as you think
The marketing for smart bulbs often centers on energy savings, highlighting their efficient LED technology compared to old incandescents. While it’s true that an active LED uses far less power, this overlooks a crucial detail: the “phantom load.” Smart bulbs are never truly off; they remain in a standby state, constantly drawing a small amount of power to maintain their connection to the network and listen for the next command. This vampire draw, though small for a single bulb, can add up significantly across an entire home, especially as smart lighting represents 15-20% of smart home appliances in many modern households.
The amount of standby power consumed varies dramatically depending on the bulb’s technology. Understanding these differences is key to making an economically sound decision for your home. Wi-Fi bulbs are typically the least efficient in this regard, while Zigbee and Thread/Matter bulbs, designed for low-power operation, perform much better. For multi-bulb fixtures like a kitchen ceiling with six recessed lights, the most efficient solution is often a hybrid approach: using a single smart switch or dimmer to control multiple, high-efficiency “dumb” LED bulbs. This gives you smart control with only one device consuming standby power. The following table breaks down the typical costs.
| Protocol Type | Idle Power Draw | Annual Cost (10 bulbs) | Best Use Case |
|---|---|---|---|
| Wi-Fi Bulbs | 1-2 watts | $15-30 | Standalone installations |
| Zigbee Bulbs | 0.3-0.5 watts | $5-8 | Large-scale deployments |
| Thread/Matter | 0.2-0.4 watts | $3-6 | Future-proof systems |
| Smart Switch + Regular LEDs | 0.5 watts total | $0.75 | Multi-bulb fixtures |
This doesn’t mean smart lighting is a bad investment. The intelligence of the system can lead to far greater savings that outweigh the phantom load. Features like occupancy sensors that turn lights off in empty rooms, daylight harvesting that dims lights when natural light is sufficient, and scheduling can slash your overall energy use. The key is to see the whole picture.
Case Study: Switzerland’s Bellinzona Smart Street Lighting Project
In June 2024, the city of Bellinzona in Switzerland completed the installation of over 2,600 smart streetlights. While each light has a standby power draw, the system as a whole has resulted in a 50% reduction in energy consumption. This massive saving was achieved through intelligent dimming during off-peak hours, occupancy detection, and precise scheduling. This large-scale project demonstrates a critical principle: the energy saved through intelligent operation can vastly outweigh the minimal cost of idle power consumption.
The security flaw in cheap smart bulbs that gives hackers access to your Wi-Fi
In the rush to build a smart home, it’s tempting to opt for budget-friendly, off-brand smart bulbs. However, this convenience often comes at a steep, hidden price: your digital security. Many inexpensive smart devices are rushed to market with little to no consideration for cybersecurity. They often contain unpatched vulnerabilities, use default passwords that are never changed, and lack any mechanism for receiving security updates. A vulnerable smart bulb is not just a malfunctioning light; it’s a potential backdoor into your entire home network. Once a hacker gains access to the bulb, they can use it as a pivot point to attack more valuable targets on your network, like your computer or NAS drive, where your personal and financial data resides.
This is not a theoretical threat. Security researchers have repeatedly demonstrated how to compromise smart home devices to gain network access. The risk is particularly high with devices that use older, less secure protocols or have poorly implemented security features. As experts in the field have pointed out, these vulnerabilities are a known attack vector.
Researchers showed that Zigbee Light Link devices can be hijacked through default keys, enabling lateral attacks on corporate networks.
– Check Point Research Team, Smart Lighting Market Analysis Report
Protecting your home requires a layered approach to “digital hygiene.” The first and most critical step, as discussed earlier, is to segregate all IoT devices onto an isolated guest network. This acts as a firewall, preventing a compromised bulb from accessing your primary devices. Beyond that, it’s essential to choose products from reputable brands that have a track record of providing firmware updates. Always change default passwords during setup and enable the strongest available encryption on your router (WPA3 is the current standard). For advanced users, using a local-only control system like Home Assistant can prevent your devices from “phoning home” to potentially insecure cloud servers, giving you complete control and privacy.
How to create a “sunrise simulation” that actually wakes you up gently?
The jarring sound of an alarm clock is a stressful and unnatural way to start the day. A far better alternative is a “sunrise simulation,” which uses your smart lights to mimic the gradual dawn, gently easing you out of sleep. The science behind this is compelling: gradually increasing light, especially in the red-to-blue spectrum, signals your brain to suppress melatonin production and begin producing cortisol, the hormone that promotes wakefulness. A properly programmed sunrise simulation can leave you feeling more refreshed and alert than a traditional alarm ever could.
However, many built-in sunrise scenes are too fast or start with the wrong color. An effective simulation isn’t just a 10-minute fade to bright; it’s a carefully orchestrated sequence of color and intensity that mirrors a natural dawn. The process should begin at least 30-45 minutes before your desired wake-up time, starting with very dim, deep red tones. Red light has the longest wavelength and is the least disruptive to a sleeping state, allowing your body to begin the waking process without being shocked into it. As time progresses, the light should slowly transition through orange and amber hues, gradually increasing in brightness, before culminating in a bright, blue-toned daylight white at your alarm time. This final blast of bright light is what fully locks in the “daytime” signal to your brain.

To implement this, you’ll need to create a custom scene or automation. Here is a scientifically-backed sequence for an optimal cortisol response:
- 45 minutes before wake: Start with a deep red light (1800K) at just 1% brightness.
- 30 minutes before: Transition to a warm orange (2200K) at 10% brightness.
- 20 minutes before: Shift to a rich amber (2700K) at 30% brightness.
- 10 minutes before: Move to a warm white (3000K) at 50% brightness.
- Wake time: Peak at a bright, energizing daylight (5000K) at 80-100% brightness.
For maximum effect, it’s recommended to maintain this bright daylight for at least 30 minutes after you wake up. This ensures melatonin is fully suppressed and helps to anchor your circadian rhythm for the day ahead.
The lighting error that disrupts your circadian rhythm in windowless corners
Many homes and apartments have them: a dark hallway, a basement office, or a bathroom with no natural light. The common mistake is to illuminate these spaces with a single, static light fixture that is left on with the same color and intensity all day. This is a significant error in lighting design because it creates a “circadian dead zone.” While the rest of your home’s lighting may be adapting to the time of day, this one static, often cool-white light, is sending a constant “mid-day” signal to your brain. Walking through that space in the evening can be enough to send a confusing, wakefulness-promoting jolt of blue light that disrupts the winding-down process you’ve carefully cultivated elsewhere.
The solution is to treat these windowless spaces as if they had a “virtual window.” The smart lighting in these areas should also be programmed to follow a circadian cycle, even more so than rooms with natural light. During the morning and early afternoon, the lights should be bright and cool (e.g., 5000K) to promote alertness and mimic daylight. As the afternoon progresses, they should automatically begin to warm up and dim, transitioning to a soft, warm glow (e.g., 2700K) in the evening. This ensures that a late-night trip to the bathroom doesn’t flood your system with sleep-disrupting blue light.
This concept of a “virtual window” has been proven effective in professional settings. A case study on implementing circadian lighting in windowless basement offices demonstrated significant benefits. By using RGB light panels programmed to mimic the full daylight cycle—from a crisp 6500K in the morning to a warm 2700K by evening—the project was a resounding success. According to research from Philips Lighting, this setup improved worker productivity by up to 23% and enhanced overall well-being. This powerful result shows that aligning artificial light with natural cycles is critical for performance and health, especially in spaces devoid of natural light.
Why do solar lights dim by 50% when the battery gets cold?
While this guide focuses on indoor, grid-powered lighting, many homeowners extend their smart ecosystems outdoors with battery-powered devices like the Philips Hue Go or solar-powered path lights. A common complaint with these devices is a dramatic drop in performance during cold weather. A light that shines brightly for hours in the summer may dim significantly or die completely after a short time in the winter. The reason for this isn’t a fault in the light itself, but a fundamental principle of battery chemistry: cold temperatures drastically reduce a battery’s effective capacity and power output.
Inside a battery, a chemical reaction releases electrons to create an electrical current. When the temperature drops, this chemical reaction slows down significantly. The internal resistance of the battery increases, making it much harder for the power to get out. For a lithium-ion battery, the type used in most quality portable electronics, performance can drop by 20% at freezing (32°F/0°C) and by as much as 50% at 0°F/-18°C. This means your fully charged battery effectively has only half its power available to the light, causing it to dim quickly or fail to turn on at all.
While you can’t change the laws of physics, you can use smart strategies to maximize the performance of your battery-powered lights in the cold:
- Choose the right battery type: If your device uses replaceable batteries, always opt for lithium batteries over alkaline ones. Lithium chemistry performs significantly better in cold temperatures.
- Insulate and store wisely: If possible, keep portable lights indoors at room temperature until you need to use them. For fixed outdoor lights, a small, insulated enclosure can help trap some of the heat the device generates.
- Manage your expectations and programming: Create a “Winter Mode” scene for your outdoor lights that uses a lower default brightness setting, perhaps 30-50% of the normal level. This reduces the power demand on the cold battery, allowing it to last much longer.
- Warm-up period: When bringing a cold device indoors, allow it to warm up to room temperature for 15-20 minutes before charging to avoid damaging the battery cells.
Key Takeaways
- Network First: A stable, reliable smart lighting system starts with a solid network foundation, prioritizing Zigbee or a dedicated Wi-Fi IoT network over a crowded main Wi-Fi.
- Program with Science: Effective wellness lighting is about more than “warm light”; it’s about engineering gradual, automated transitions in color and brightness that mirror natural circadian rhythms.
- See the Full Picture: Account for the hidden costs of standby power and the critical importance of security by choosing reputable brands and isolating devices on your network.
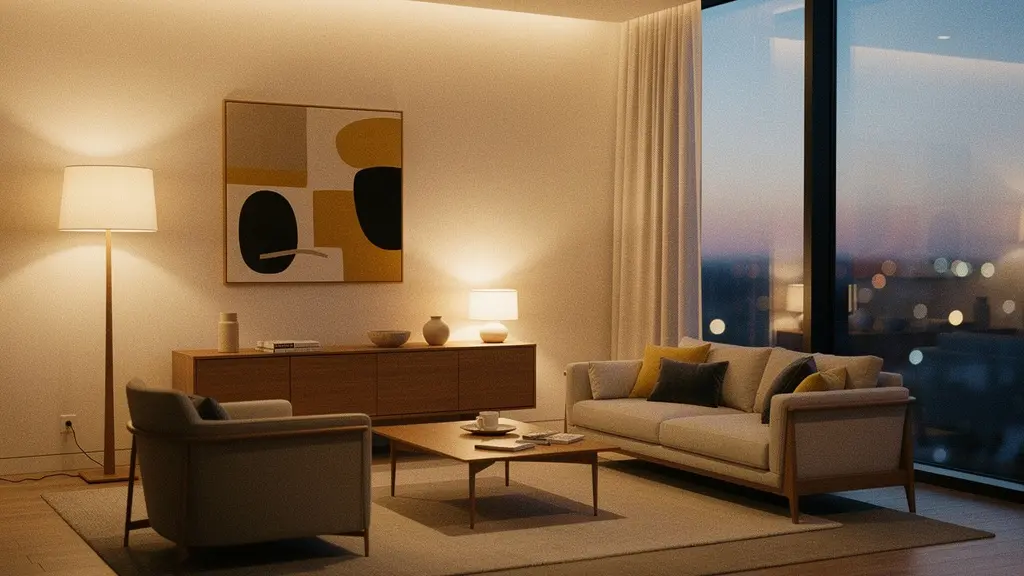
How to Arrange a 400 Sq Ft Apartment to Reduce Daily Stress Levels?
In a small living space like a 400 sq ft apartment, light is one of the most powerful tools for defining areas and influencing mood. Without physical walls, light becomes your primary method for creating “zones” and signaling the transition between activities, which is crucial for reducing stress and maintaining a healthy work-life balance. Using a single overhead fixture to illuminate the entire space is a recipe for a monotonous and stressful environment. A strategic, layered smart lighting approach can make a small apartment feel larger, more functional, and more psychologically comfortable.
The key is to create distinct lighting zones for different activities: Work, Dine, and Relax. This doesn’t require physical partitions, only different light qualities.
- The Work Zone: Your desk area should be equipped with a task lamp programmed to a cool, focus-enhancing white (4000-5000K) during your work hours. This bright light keeps you alert and productive.
- The Dining Zone: A pendant light over a small table, set to a warmer, more intimate white (3000K) and put on a dimmer, creates a dedicated space for meals that feels separate from the rest of the room.
- The Relaxation Zone: The seating or couch area should be lit with a floor lamp and table lamps using very warm, cozy light (2200-2700K). This is the “off-duty” zone where you unwind.
The magic happens when you automate the transitions. Program an “End of Day” scene that automatically fades down the work zone light at 6 PM while simultaneously bringing up the lights in the dining and relaxation zones. This automated environmental shift acts as a powerful psychological cue, helping your brain to switch off from work and transition into personal time, even if you’re only moving five feet across the room.
This zoning strategy has proven benefits. A 2017 study found that in compact living spaces without adequate natural light, implementing a three-layer lighting strategy (ambient, task, accent) with programmable smart bulbs created a perception of greater spatial depth and led to reduced reported stress levels among residents. By using light to create rooms within a room, you take control of your environment and build a space that actively supports your well-being.
You now possess the integrator’s blueprint for a truly smart lighting system. The next step is to move from theory to practice. Begin by auditing your home network, then thoughtfully design your first circadian scene. Start building a smarter, healthier, and more efficient home, one light at a time.